Week 12: Mechanical Design, Machine Design
regional meeting
Mkhitar Evoyan

Zhirayr Ghukasyan
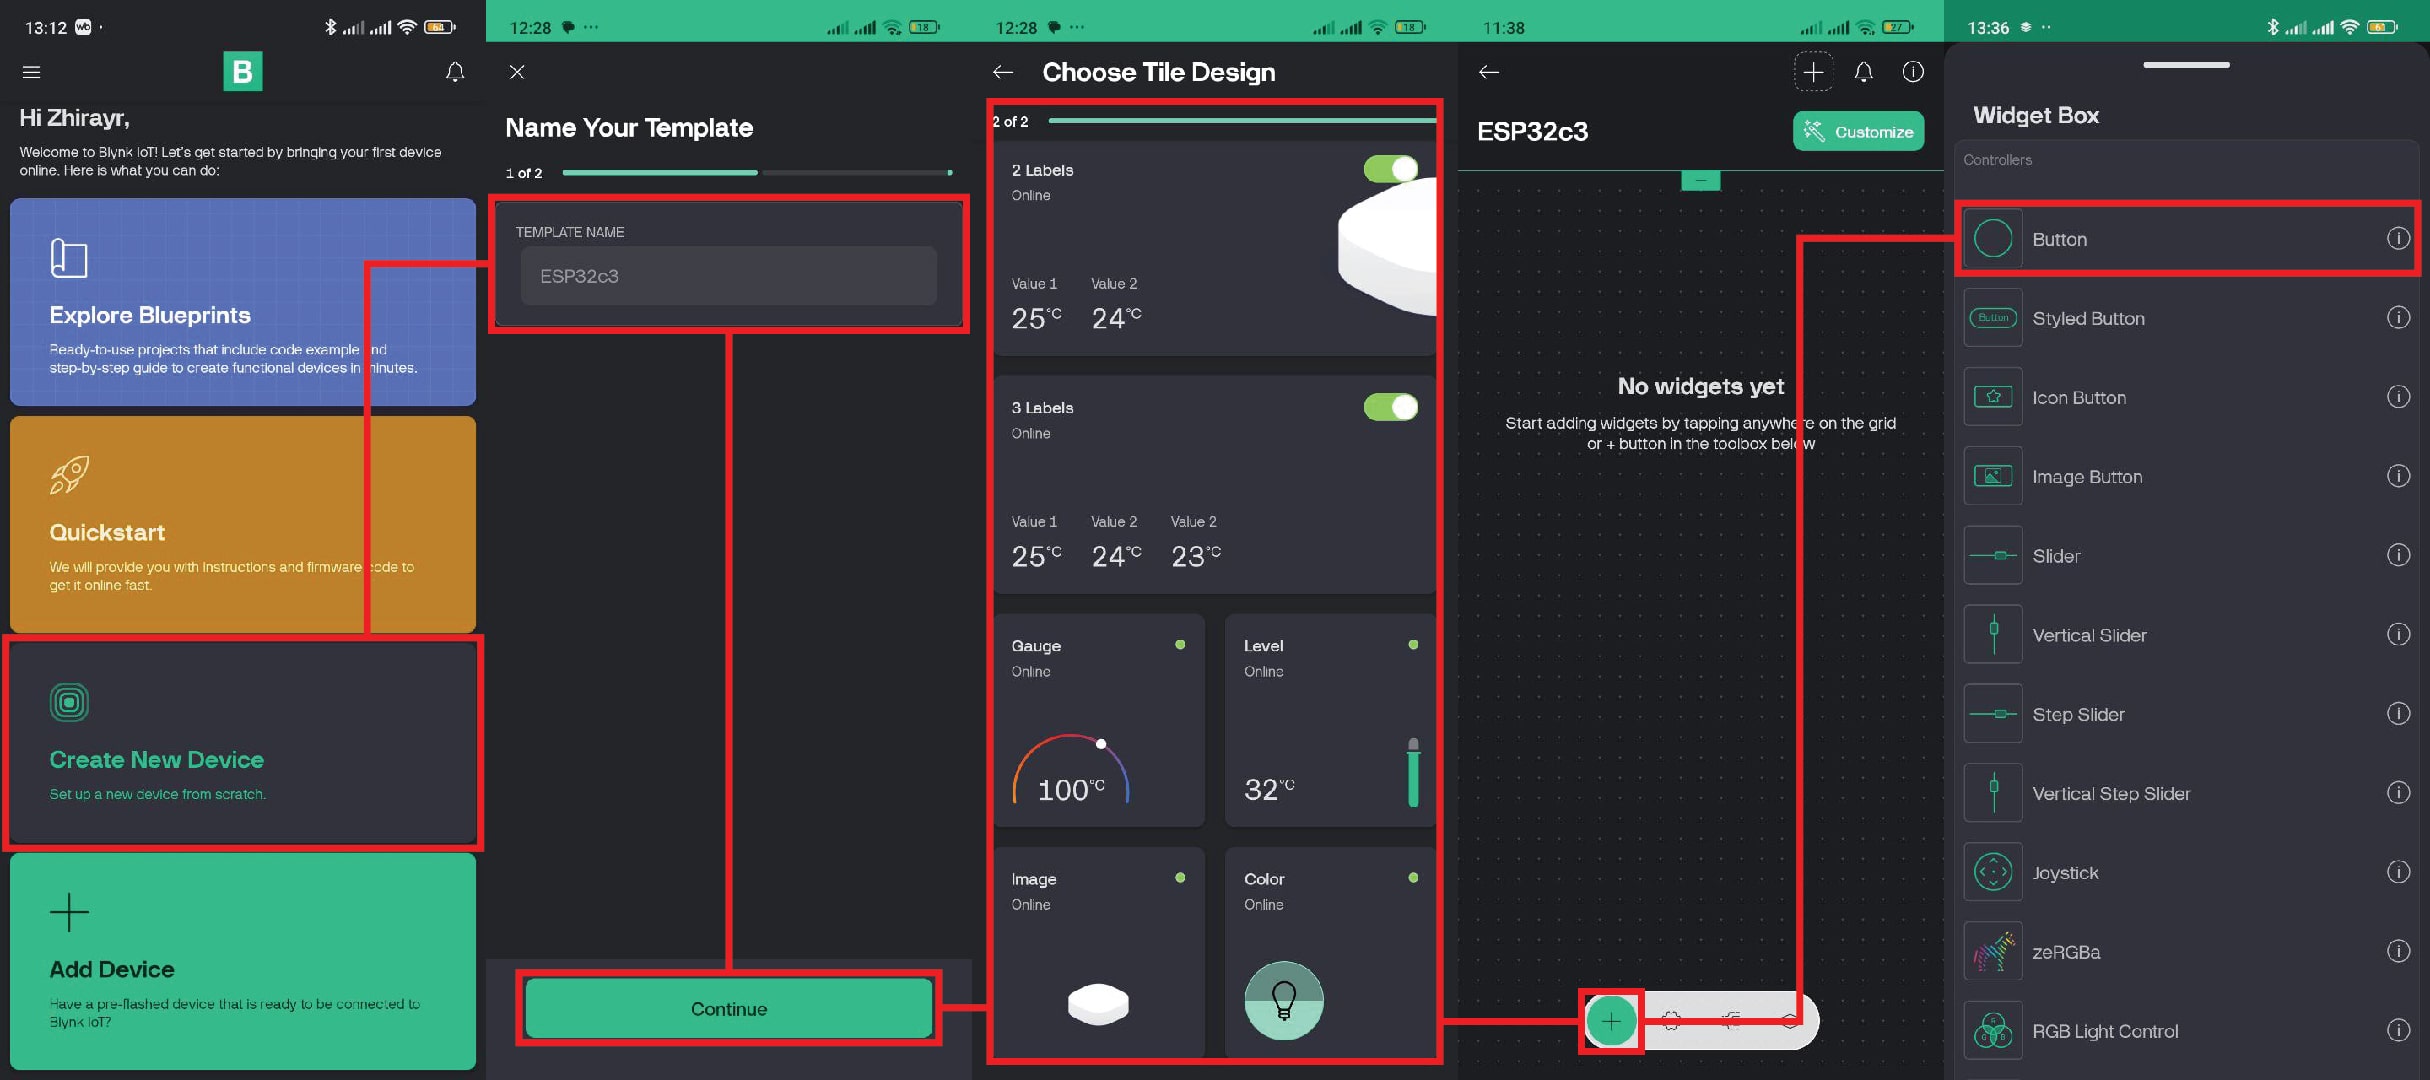
blynk https://blynk.io/blueprints/blink-an-led-with-esp32
Jakob Lerch
Irja Linnerud
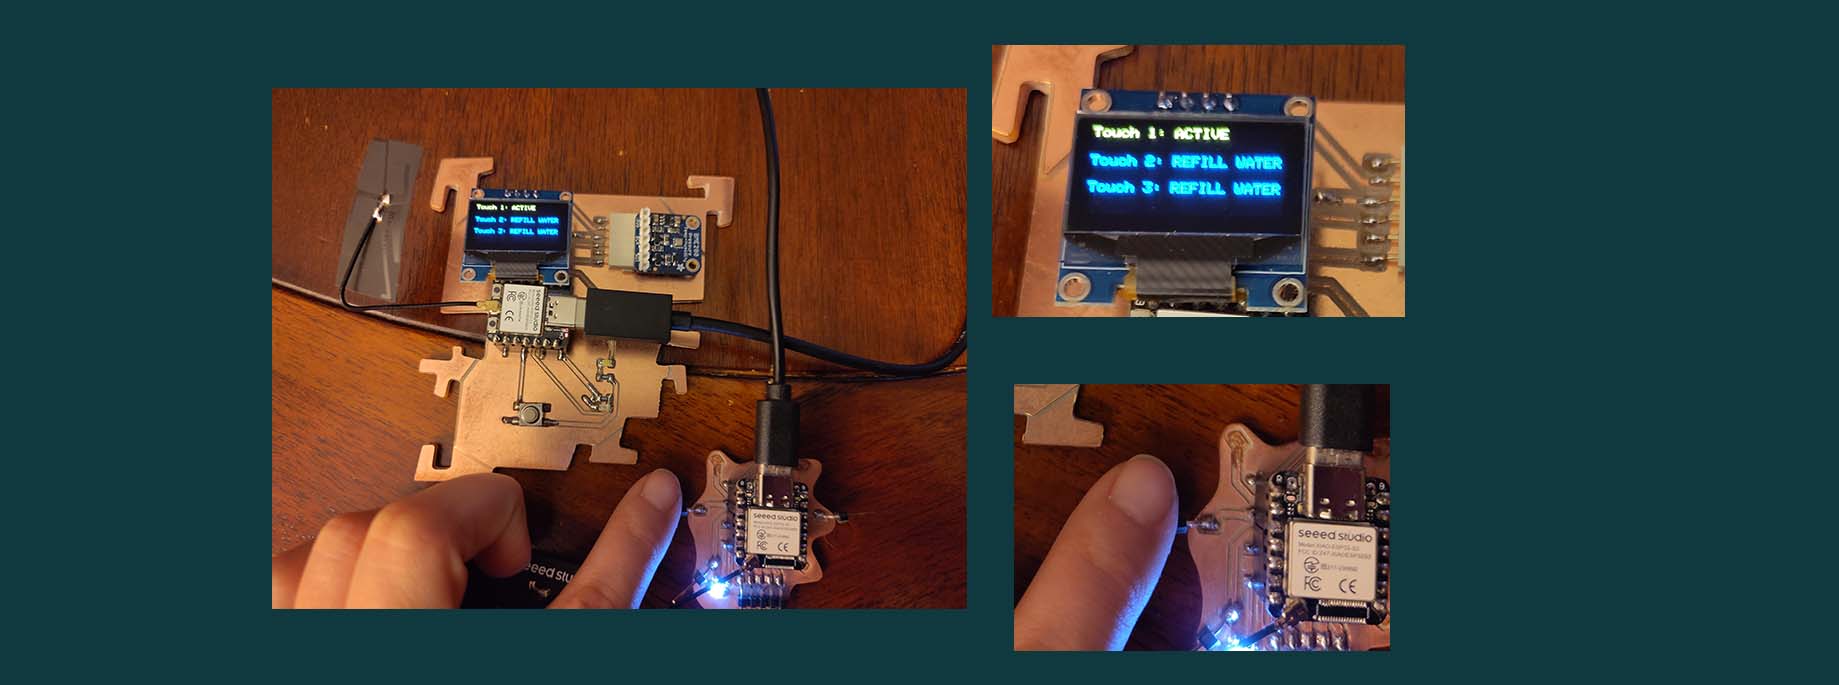 http://irja-ed23b9.waaglabs.nl/assets/images/week11/touch_display.jpg image
Sam Hos
Dylan Heneck

https://www.schmalzhaus.com/EasyDriver/Examples/EasyDriverExamples.html
Patrick Dezséri
Forrest Oliphant
arduino-audio-tools' streams-url_mp3_helix-i2s example
Chat
13:06:22 Von Patrick an Alle: you can use ShareX to have nice screen video capture instead of using your phone to film your laptop screen
https://getsharex.com/13:10:08 Von Patrick an Alle: Antenna connected to a buoy ?
13:24:42 Von Babken Chugaszyan an Alle: Hey guys sorry for connecting late.
13:24:50 Von ferdi an Alle: I think it is the hope rf hm-trp-915 rf module
13:25:32 Von ferdi an Alle: https://www.sparkfun.com/rfm69hcw-wireless-transceiver-915mhz.html
13:27:25 Von henk an Alle: https://fabacademy.org/2024/labs/waag/students/leo-kuipers/weekly-assignments/14_interface-and-application-programming/14_interface-and-application-programming/#webbrowser-midi-sample-player
13:32:10 Von henk an Alle: http://irja-ed23b9.waaglabs.nl/
13:32:26 Von henk an Alle: http://sam-78f04d.waaglabs.nl/
13:42:34 Von ferdi an Alle: My Standard example is https://www.schmalzhaus.com/EasyDriver/Examples/EasyDriverExamples.html
13:51:08 Von jakob an Alle: Regarding MIoTy:
This is the specification: https://www.etsi.org/deliver/etsi_ts/103300_103399/10335702/02.01.01_60/ts_10335702v020101p.pdf

MIoTy is the commercial name. TS-UNB is the name that is used in the specification.

This is a library for the pico: https://github.com/mioty-iot/TS-UNB-Lib-Pico

I did not look into it too deeply, but i guess it only contains the code for the transmitter.

From my current knowledge, i do not really get how it is different from LoRa. In particular, I do not understand, why lora hardware can be used here. maybe there are some details in the specifications that allow this...
13:57:14 Von Forrest O. an Alle: @ferdi https://gitlab.com/kriwkrow/networking-with-xiao-esp32-demo w/ kicad and arduino
13:58:34 Von Dylan Heneck an Alle: EPIC
13:58:48 Von Dylan Heneck an Alle: did you document?
13:58:54 Von Forrest O. an Alle: 💨
prep meeting
https://fabacademy.org/2023/labs/dilijan/projects/machine_building/
https://gitlab.cba.mit.edu/neilg/urumbu/-/tree/master/UrumbotXY
global class homework
Edward Woodhouse
Final project:
Optical Solar Cooker CPC
Roland Winston and Henry Hinterberger originally described CPCs in 1966 for the efficient collection of diffuse Cherenkov radiation (radiation generated when a particle moves faster than the phase velocity of light through a medium) during high-energy physics experiments. CPCs were subsequently more widely adopted to concentrate light for solar power production.
https://news.mit.edu/2023/using-kirigami-ultrastrong-lightweight-structures-0822
https://aprubio.com/2025/01/13/metallic-kusudama/
electroplated paper? metalized Mylar!
Lei Feng
Teamlead UX-Design Seeed

https://makezine.com/article/uncategorized/the-band-began-to-play-the-history-and-future-of-fab-labs/
Final project:
Manzi Armel
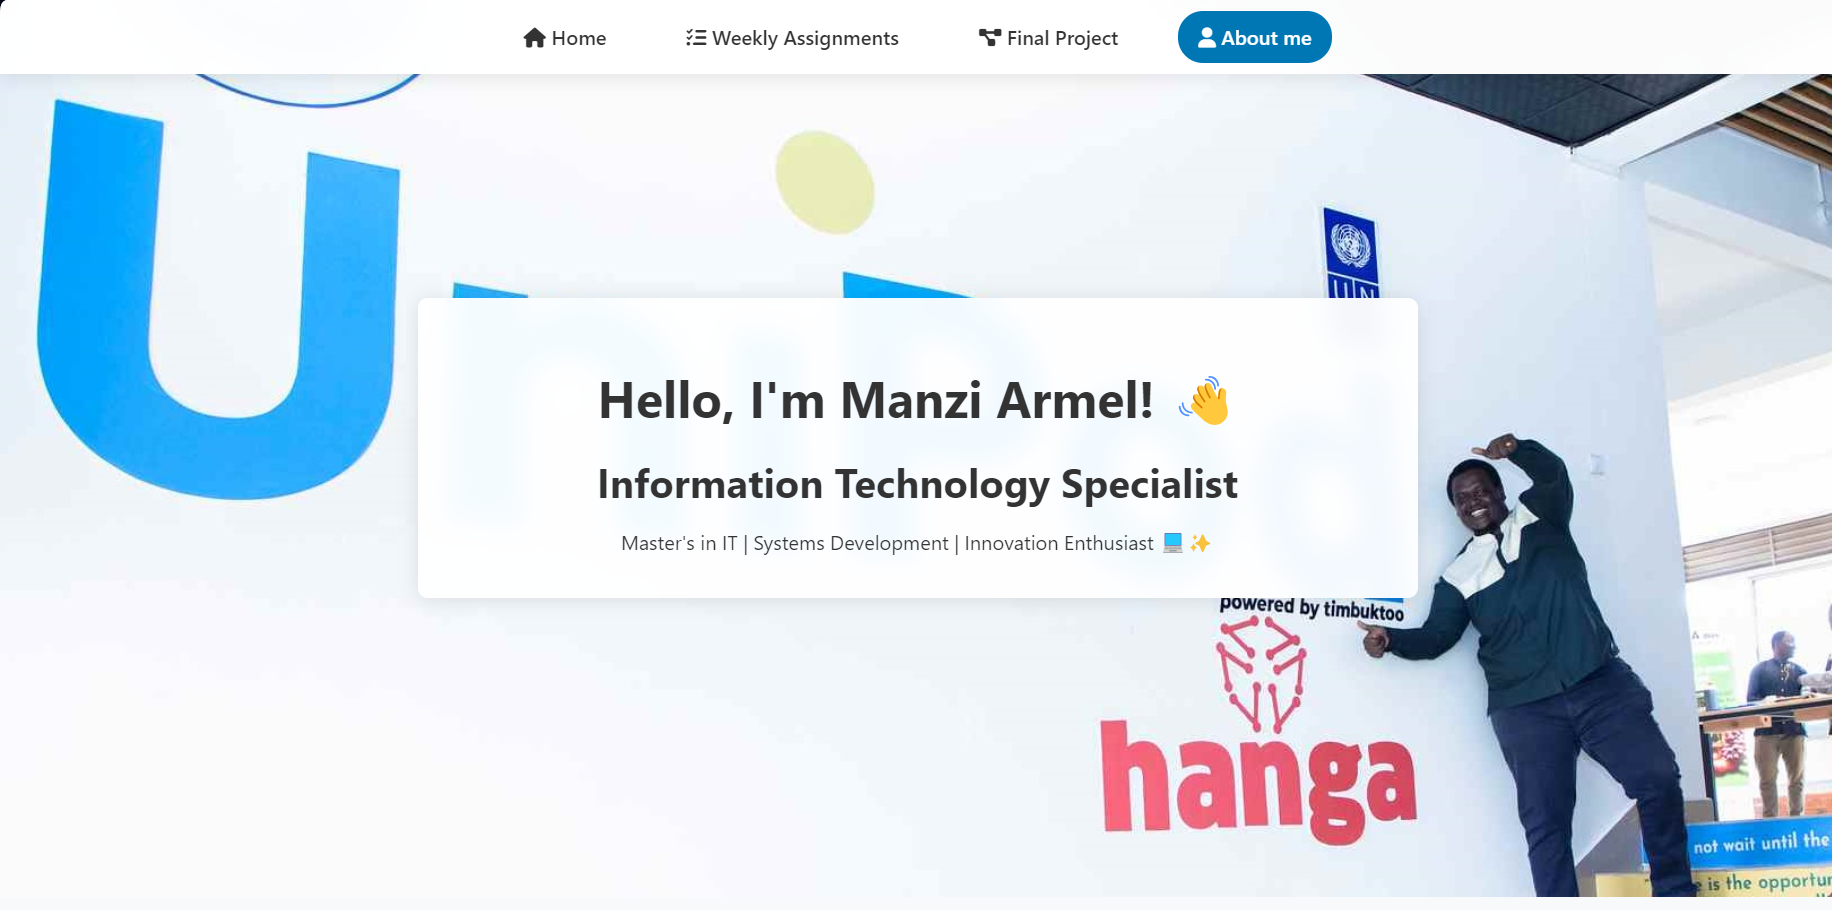
University of Rwanda https://www.fablabs.io/labs/FabLabRwanda
Final project:
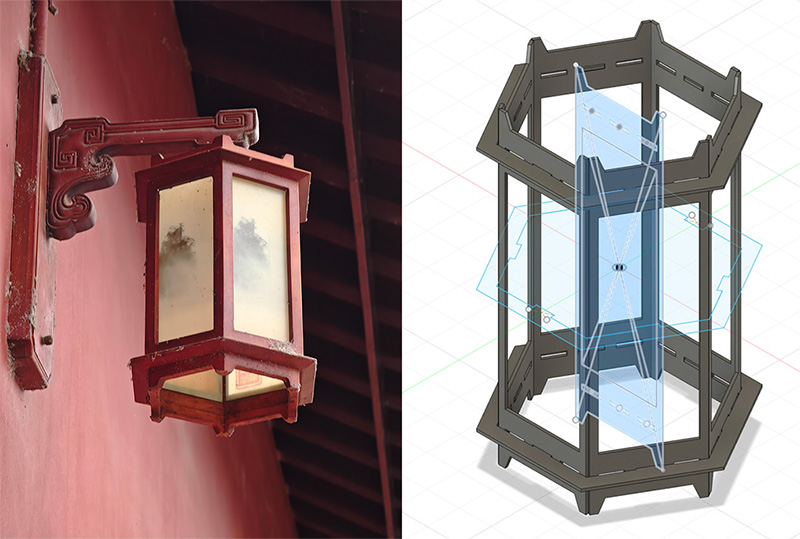
Power access control device
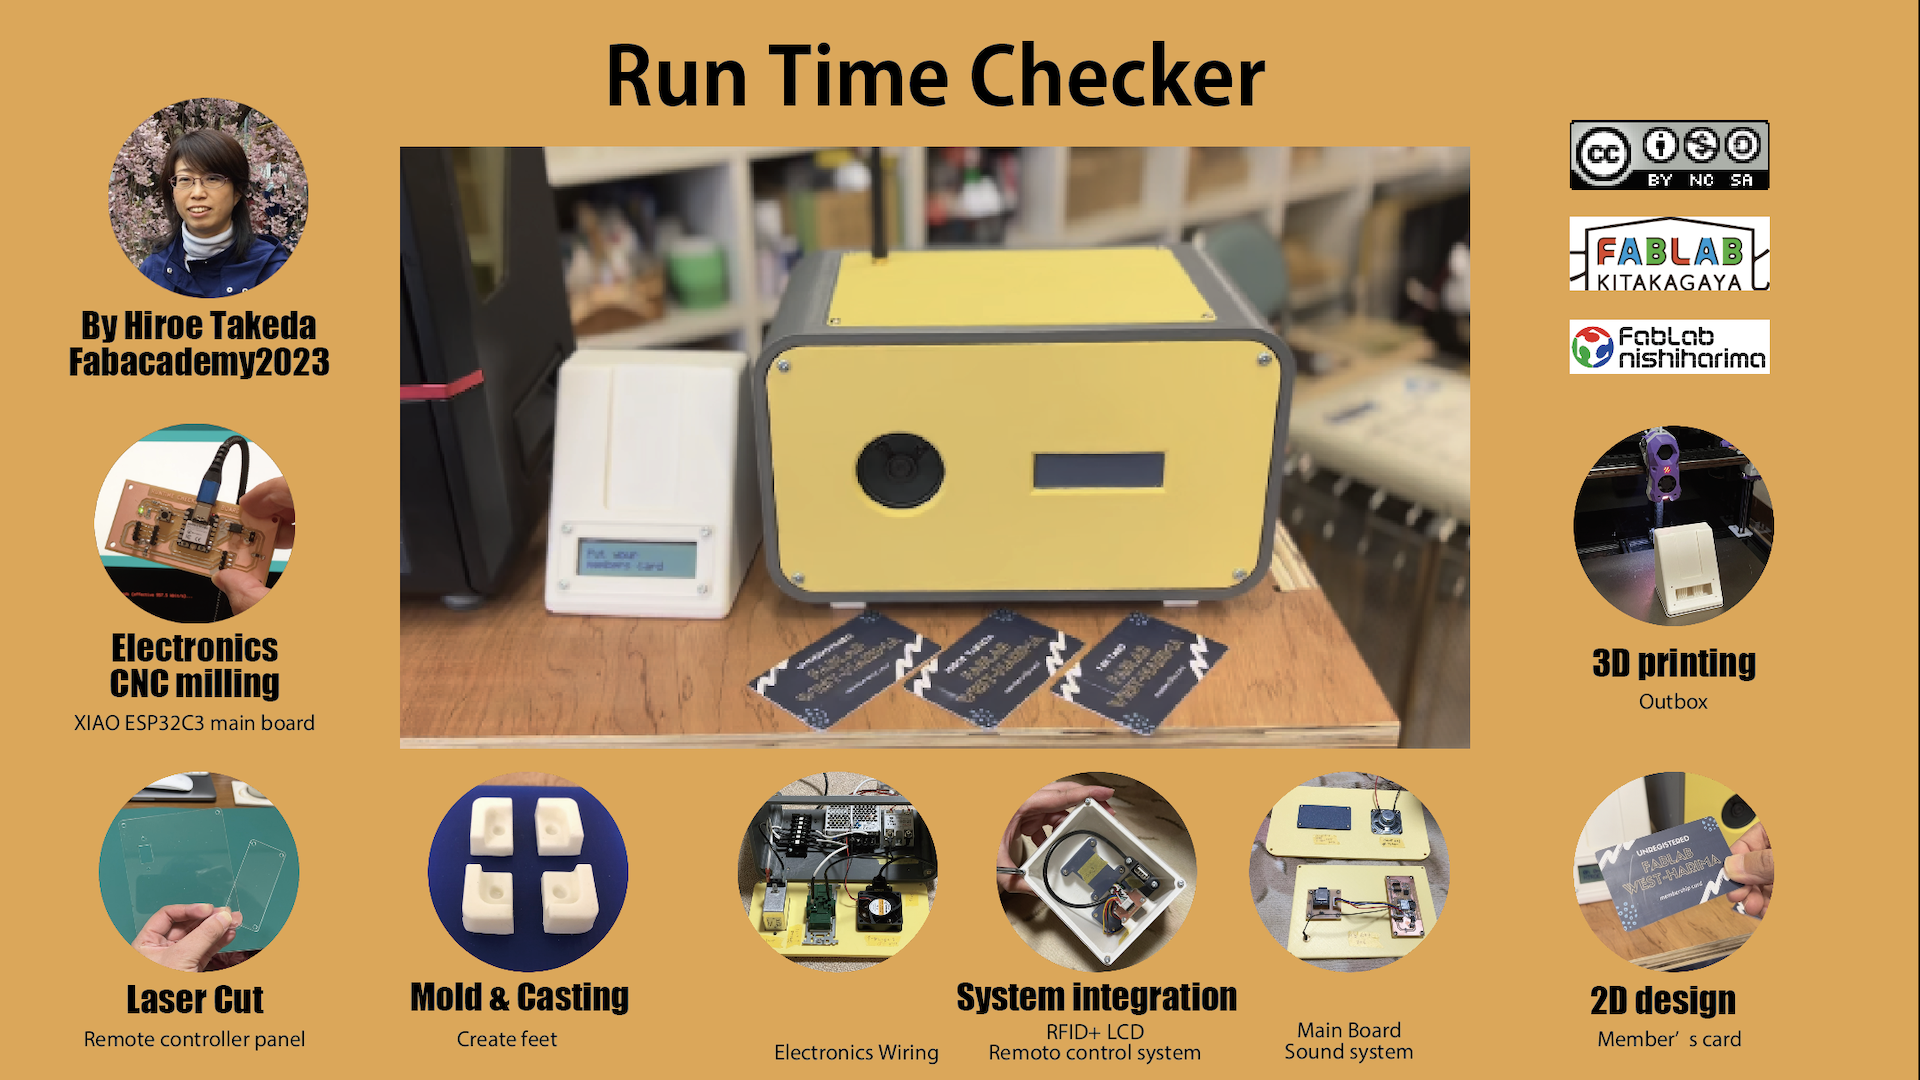
https://fabacademy.org/2023/labs/kitakagaya/students/hiroe-takeda/final-project/final-project/
Jhonatan Estiven Cortes Ceron
Shoko Kudomi
Final Project: Cultural Memory Globe

Akash Edamana
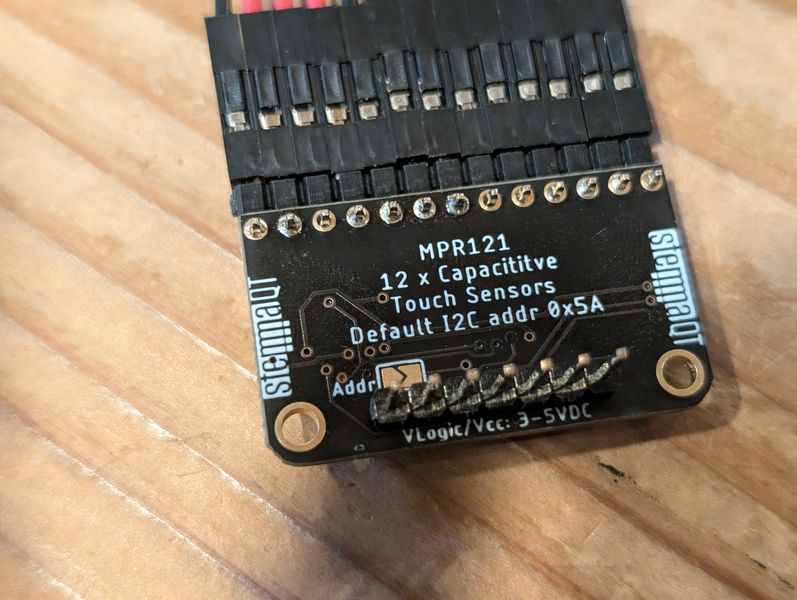
Ultra-Wideband (UWB) is a short-range wireless communication technology
6Mb/s 3D position?!
by using multiple Nodes i an get position data in 2D & 3D with 10 cm accuracy
Revisankar S
https://fabacademy.org/2025/labs/kochi/students/revisankar-s/assignments/Week11.html https://youtu.be/AfmLbsWgikQ?si=8YA5NESzheKdXQjX
Camila Luna
global class
https://gitlab.cba.mit.edu/neilg/urumbu/-/tree/master/UrumbotXY
Urumbubot2.0

MPC = Model predictive Control
Chat
14:39:14 Von Babken Chugaszyan an Alle: It;s surprisingly similar to our 2023 machine https://fabacademy.org/2023/labs/dilijan/projects/machine_building/ Adrián - Fab Lab León:❤️
14:42:05 Von Claire: Lake Mac Libraries Fab Lab an Alle: Can you please take us off the machine list Neil, my student has had to drop out Milliam, Rico Kanthatham:🥲
14:42:15 Von Jani Ylioja an Alle: Highly recommended to have a video ready in case of demo-effect :) Babken Chugaszyan, Pablo Fab Lab León, Daniel Mateos, Oscar Diaz:👍 Adrián - Fab Lab León:🙏
14:43:56 Von Pablo Fab Lab León an Alle: Which will be the order of machine presentations? lab list or asia first?
14:46:14 Von Oscar Diaz an Alle: Our students wants to make a rotocasting machine but here is the thing... they want to upcycle an old machine for this but in experience would be less challenging to create one using new components VS upcycle a machine for this?
14:47:35 Von Jani Ylioja an Alle: Impossible to say which is harder Oscar Diaz:😵💫
14:47:35 Von Daniel Mateos an Alle: Our students want to build a machine whose design is already publicly available. What amount of redesign would be required to qualify for the assignment?
14:47:37 Von Oscar Diaz an Alle: Ok thanks
14:53:58 Von Pablo Fab Lab León an Alle: Welcome!!!
14:54:04 Von Adrián - Fab Lab León an Alle: 👏
14:54:05 Von Anith Ghalley an Alle: ❤️
14:54:06 Von Nuria Robles | LEON an Alle: Welcome!!!
14:54:28 Von Claire: Lake Mac Libraries Fab Lab an Alle: 🎉
14:58:13 Von Andrr - Fab Lab Reykjavik an Alle: im looking at the repo, looking for examples for output devices in 2018, and it links to http://academy.cba.mit.edu/classes/output_devices/index.html... so I do not really have access to the fabacademy examples of 2018.. or am i misunderstanding?
14:58:47 Von Andrr - Fab Lab Reykjavik an Alle: youre muted
14:59:43 Von Nicolas De Coster an Alle: didn't get where to find the F1 ultra pcb FR1 parameters on production page
15:00:03 Von Neil an Alle: https://academy.cba.mit.edu/classes/electronics_production/galvo.jpg
15:00:10 Von Nicolas De Coster an Alle: ok :) thanks for the link
15:00:14 Von Nicolas De Coster an Alle: thank you
15:00:47 Von Nicolas De Coster an Alle: making holes is ok?
15:02:23 Von Pablo Fab Lab León an Alle: Fab Lab in the Red Sox stadium XD Peter Perez - Moonlighter Fablab/Belen:👍
15:03:10 Von Adrián - Fab Lab León an Alle: It´s a trap hehe
15:03:45 Von Rico Kanthatham an Alle: Dry run for Final Project
15:04:25 Von Patrick-waag an Alle: Replying to "It´s a trap hehe": itsatrap.jpg
15:05:21 Von jakob an Alle: Sorry for the question, I had audio problems:
Is the idea to do these tasks within the midterm break? Will the meeting with the global instructor take place at the end of the break or at its beginning?
15:05:49 Von jakob an Alle: Replying to "Sorry for the question, I had audio problems: Is...": alright, thanks!
15:06:56 Von Forrest O. an Alle: woo project management lets goooooo jakob, Claire: Lake Mac Libraries Fab Lab:😄
15:09:27 Von Patrick-waag an Alle: f58c42d84ab9a393635fa2e391f994e1.jpg Forrest O., Peter Perez - Moonlighter Fablab/Belen, Jani Ylioja, Pablo Fab Lab León, Adrián - Fab Lab León:😂
15:10:38 Von Fab Lab BCN an Alle: Ed Woodhouse here
15:12:56 Von Rico Kanthatham an Alle: push your button!
15:12:59 Von Rico Kanthatham an Alle: 2025-04-09 22_12_17-FMCU.jpg
15:13:24 Von Patrick-waag an Alle: Replying to "2025-04-09 22_12_17-FMCU.jpg": the two awards XD
15:13:42 Von Marius Araújo an Alle: Replying to "2025-04-09 22_12_17-FMCU.jpg": Refresh 🙂
15:15:06 Von Rico Kanthatham an Alle: Thank you in advance Lei-Feng!
15:16:01 Von Neil an Alle: https://makezine.com/article/uncategorized/the-band-began-to-play-the-history-and-future-of-fab-labs/
15:16:25 Von Claire: Lake Mac Libraries Fab Lab an Alle: Replying to "2025-04-09 22_12_17-FMCU.jpg": Pushed :)
15:16:45 Von Forrest O. an Alle: https://fabacademy.org/2025/labs/chaihuo/students/lei-feng/en/about/about_en ”We are like slime molds, constantly expanding our footprint outward with Shenzhen as the center.” awesome. Patrick-waag:👀 Rico Kanthatham, Adrián - Fab Lab León:🩵
15:17:55 Von Rico Kanthatham an Alle: Replying to "2025-04-09 22_12_17-FMCU.jpg": why am i not seeing you guys?
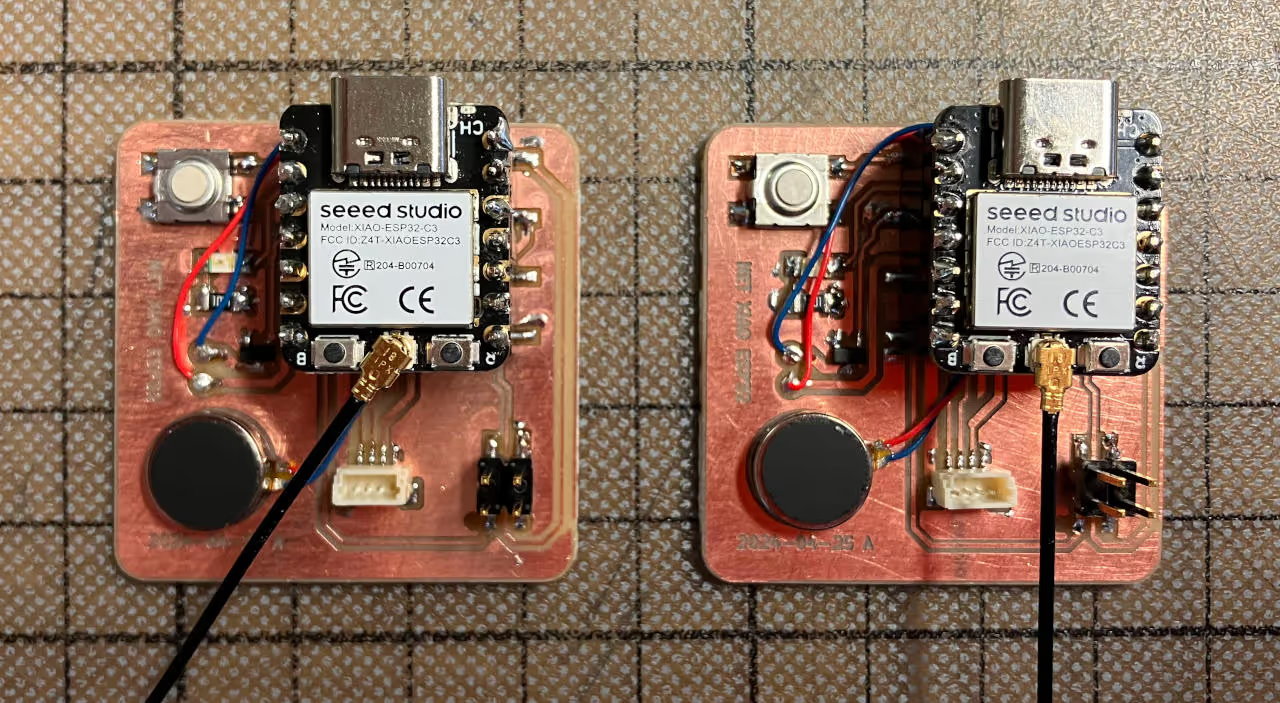
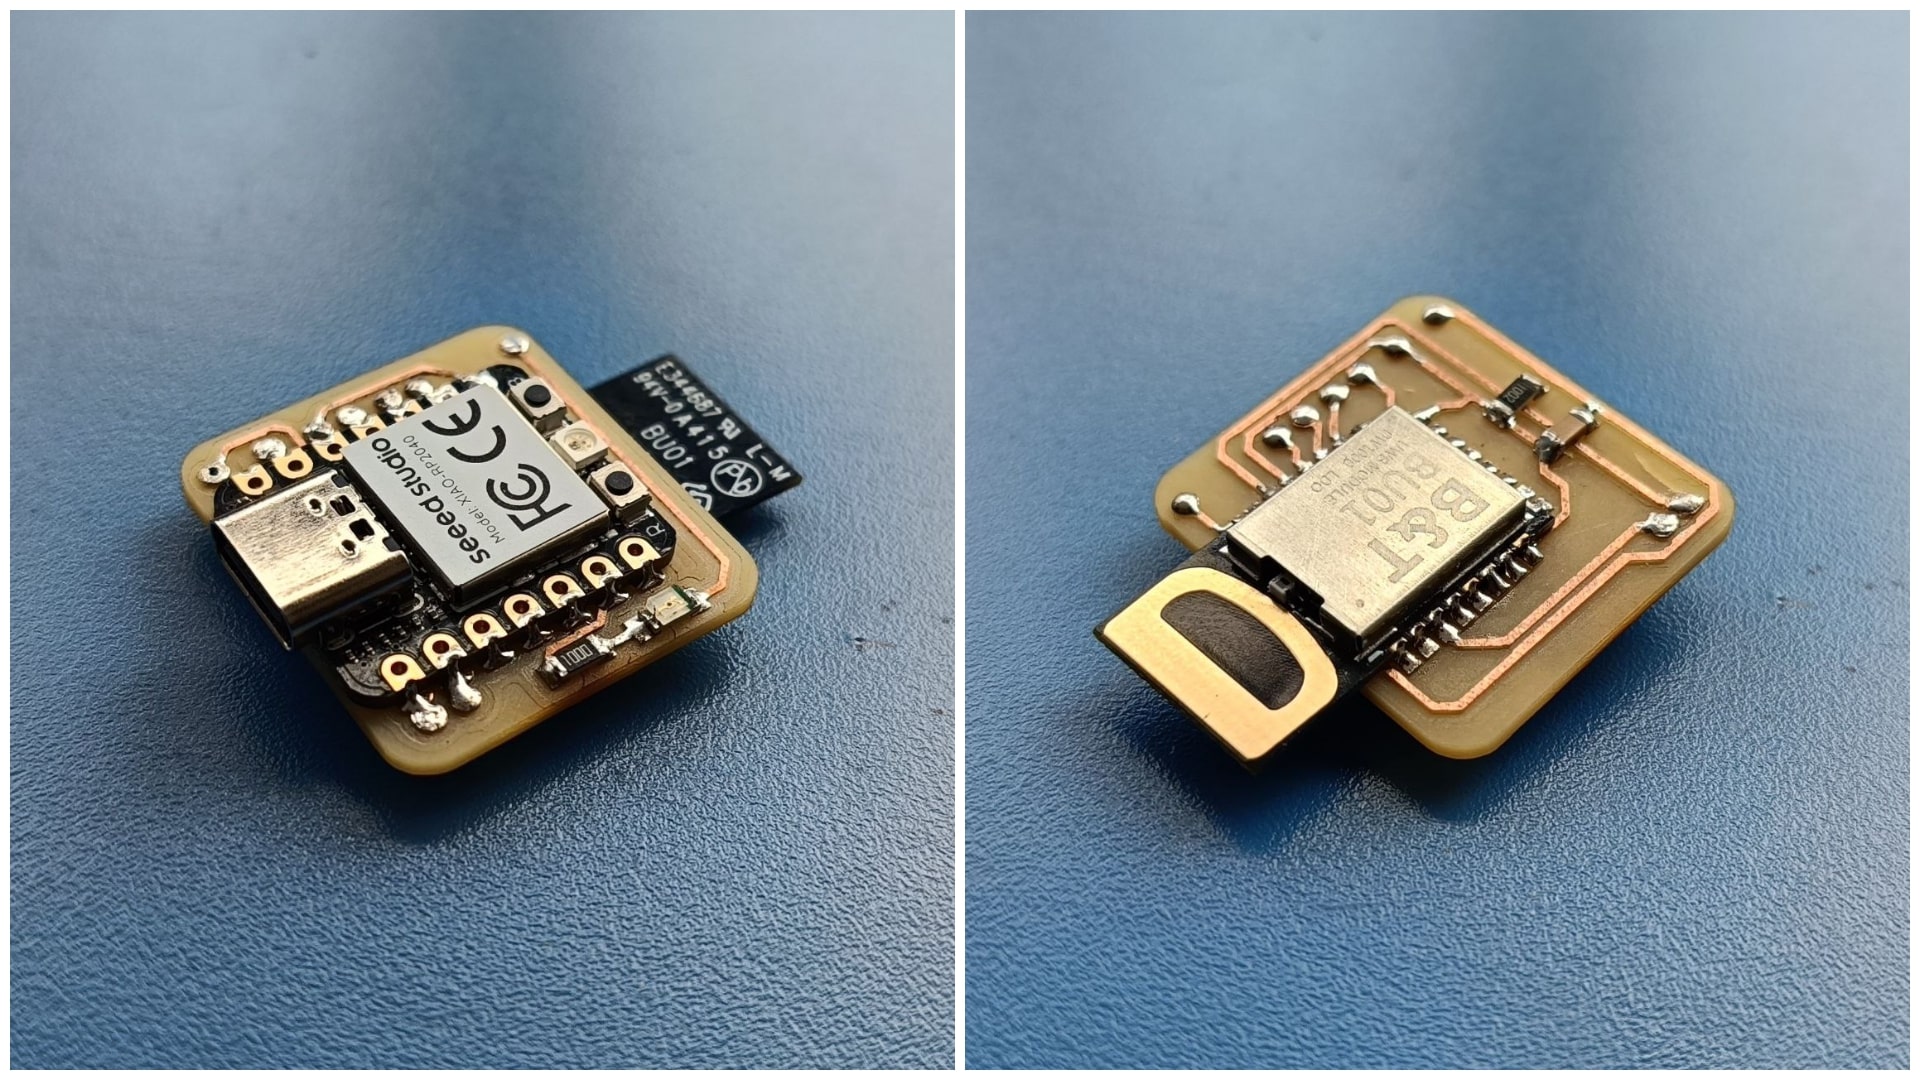
15:19:26 Von Forrest O. an Alle: Most beautiful dev board nomination.
15:19:28 Von Forrest O. an Alle: Screenshot2025_04_09_161915.jpg
15:19:41 Von Patrick-waag an Alle: Replying to "2025-04-09 22_12_17-FMCU.jpg": can you give me a doc on how to do it ? Seems like my fablab does not have one
15:19:46 Von Rico Kanthatham an Alle: Replying to "Screenshot2025_04_09_161915.jpg": Nice to see even Seeed doesn't use fancy sockets for the Xiao!
15:20:52 Von Milliam an Alle: Replying to "2025-04-09 22_12_17-FMCU.jpg": https://fmcu.fablabs.io/
15:21:03 Von Milliam an Alle: Replying to "2025-04-09 22_12_17-FMCU.jpg": https://pub.fabcloud.io/project/bootcamp-2023/fmcu/ Patrick-waag:💚
15:21:17 Von Tom an Alle: We are starting to include that the AI was "thinking" with the prompt
15:22:58 Von Forrest O. an Alle: I also provided the complete Markdown document from Week 10's individual assignment and the Week 11 course outline link (to help the AI understand the course and assignment requirements) as background reference material.
15:24:14 Von Forrest O. an Alle: Replying to "I also provided the complete Markdown document fro...": I’ve found this nice, in my code editor with my documentation site, I can put any of those docs into Claude’s context.
15:27:07 Von Patrick-waag an Alle: here comes nda x) Rico Kanthatham, Dylan Heneck, Luciana Asinari:😂
15:30:33 Von Dylan Heneck an Alle: Definitely the most complicated conversation I’ve ever listened to. Adrián - Fab Lab León, Doaa El-Bess, Garrett Nelson, Patrick-waag, Luciana Asinari:😂 Forrest O.:🫡
15:31:37 Von Forrest O. an Alle: Field trip. https://www.seeedstudio.com/chaihuo-makerspace
15:32:10 Von Garrett Nelson an Alle: Thank you Lei-Feng, it's very interesting to hear what you are doing. Lei-Feng:❤️
15:36:35 Von ferdi an Alle: Has anybody tried this: https://www.media.mit.edu/projects/e-lig/overview/ ? Adrián - Fab Lab León:❤️ Patrick-waag:👀
15:37:53 Von Adrián - Fab Lab León an Alle: Replying to "Has anybody tried this: https://www.media.mit.edu/...": Awesome
15:38:44 Von henk an Alle: $10 is my favorite
15:39:02 Von Jani Ylioja an Alle: There is logic analyzer made with esp32 :) Adrián - Fab Lab León:❤️
15:41:34 Von Rico Kanthatham an Alle: https://github.com/thelastoutpostworkshop/gpio_viewer ESP32 GPIO Viewer
15:42:06 Von Nicolas De Coster an Alle: also with rp2040
15:42:13 Von Nicolas De Coster an Alle: https://www.instructables.com/Raspberry-Pi-Pico-200Khz-Digital-Oscilloscope/
15:43:05 Von Jani Ylioja an Alle: https://github.com/ok-home/logic_analyzer
15:43:21 Von Nicolas De Coster an Alle: open logic + pocket PD delivery = our next pocket lab <3 Adrián - Fab Lab León:❤️
15:45:26 Von Adrián - Fab Lab León an Alle: Replying to "open logic + pocket PD delivery = our next pocket ...": @Nicolas De Coster Everything you need to survive hehe, I would add it to the 72-hour kit hehe.
15:45:46 Von saheen palayi an Alle: Replying to "2025-04-09 22_12_17-FMCU.jpg": @Rico Kanthatham I just joined and pressed the button, waiting for the reset Rico Kanthatham:🩵
15:45:49 Von Nicolas De Coster an Alle: there is one running in Andalusia I think
15:46:18 Von jakob an Alle: https://cba.mit.edu/docs/theses/06.08.Sun.pdf
15:46:27 Von Nicolas De Coster an Alle: The PS10 Solar Power Plant
15:46:46 Von Nicolas De Coster an Alle: Image 2025-04-09 at 154640.png
15:48:07 Von Neil an Alle: https://aprubio.com/2025/01/13/metallic-kusudama/
15:57:19 Von Adrián - Fab Lab León an Alle: Document as you go: https://youtu.be/KSs416dsgvY F.A.B. Pablo Fab Lab León:🎉 Rico Kanthatham, Jani Ylioja, Shoko K, Luis Díaz-Faes - A Industriosa:😂
15:57:51 Von Daniel Osika an Alle: might be useful for the previous project SUN FACTORY https://distributeddesign.eu/talent/sun-factory/ Frosti Gíslason - Iceland- Vestmannaeyjar - Fab Lab:😎
15:59:30 Von Adrián - Fab Lab León an Alle: Manzi, here you can fin documentation about using a Logic Analyzer: https://fabacademy.org/2020/labs/leon/students/adrian-torres/week06.html#logic Frosti Gíslason - Iceland- Vestmannaeyjar - Fab Lab, Lars Mattern - HRW Fablab, Lei-Feng:❤️ Pablo Fab Lab León, Mkhitar Evoyan:👏
16:02:55 Von Adrián - Fab Lab León an Alle: https://fabman.io/
16:03:02 Von ferdi an Alle: https://docs.fab-access.org/shelves/fabaccess
16:03:20 Von Patrick-waag an Alle: Replying to "https://fabman.io/": we use fabman too Adrián - Fab Lab León:❤️
16:03:25 Von Pablo Fab Lab León an Alle: https://fabacademy.org/2023/labs/kitakagaya/students/hiroe-takeda/final-project/final-project/ Adrián - Fab Lab León:❤️ Milliam:👆
16:03:28 Von Adrián - Fab Lab León an Alle: Hiroe
16:03:31 Von Pablo Fab Lab León an Alle: Hiroe!!
16:03:31 Von Rico Kanthatham an Alle: hiroe
16:03:33 Von Rico Kanthatham an Alle: takeda
16:04:45 Von Rico Kanthatham an Alle: This project is endorsed by Global Open Time. Adrián - Fab Lab León:💕 Milliam:😄
16:05:27 Von Pablo Fab Lab León an Alle: Super Hiroe!! Hiroe Takeda:😂
16:07:59 Von Adrián - Fab Lab León an Alle: Go Shoko!! Shoko K:❤️
16:08:07 Von Rico Kanthatham an Alle: go Shoko!!! Get 10 points! saheen palayi, Shoko K:🔥
16:08:07 Von Milliam an Alle: Ayyy~~~ Shoko!!! Shoko K:😆
16:08:14 Von Maki Laura TANAKA an Alle: Go Shoko!!! Shoko K:😆
16:08:28 Von Hiroe Takeda an Alle: Go Shoko!! Shoko K:❤️
16:08:52 Von Superfablab Kochi an Alle: Go Shokooo🎉 Shoko K:❤️
16:09:03 Von Milliam an Alle: Replying to "go Shoko!!! Get 10 points!": Hey we get to see up to her mouth this time. More than half of her face Rico Kanthatham, saheen palayi, Tshering Dorji, Pablo Fab Lab León, Shoko K:😂 Adrián - Fab Lab León:😅
16:09:56 Von saheen palayi an Alle: Replying to "go Shoko!!! Get 10 points!": I always tell that her in the review 😅 Shoko K:🫥
16:12:26 Von Adrián - Fab Lab León an Alle: Step response Milliam:👆 Shoko K:👍
16:13:55 Von Rico Kanthatham an Alle: Replying to "Step response": she did that in INput week Adrián - Fab Lab León:❤️
16:15:42 Von Jeremy Losaw an Alle: very cool project @Shoko K Shoko K:😆 Frosti Gíslason - Iceland- Vestmannaeyjar - Fab Lab:😎
16:16:07 Von Adrián - Fab Lab León an Alle: Great work Shoko!! Shoko K:😆
16:21:54 Von Camila Luna an Alle: Real-time 3D cube with Bluetooth Low Energy (BLE) communication, XIAO ESP32S3 and XIAO nrf52840 Milliam, Pablo Fab Lab León, saheen palayi:👏 henk, Adrián - Fab Lab León:😍
16:21:57 Von Camila Luna an Alle: Screenshot 2025-04-09 at 4.12.47 p.m..png Mkhitar Evoyan:👏 Delia Millán | Spain| 2022, Adrián - Fab Lab León:🥰
16:22:07 Von David Wilson an Alle: On lab management - as part of an undergraduate project in Spring 24, student did a high level review on systems / features. Not updated since, but may be helpful for some. https://docs.google.com/spreadsheets/d/1N4Ix1wqrG5gkmUFYwqRD_LXlfJljgZeaGc_ROxPcACc/edit?usp=sharing
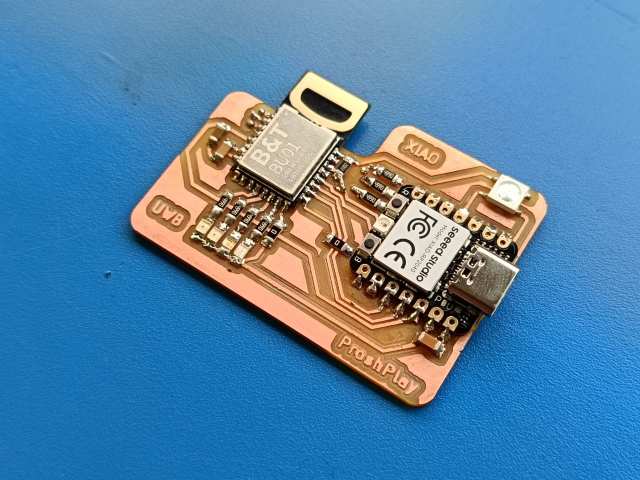
16:26:18 Von saheen palayi an Alle: https://github.com/saheenpalayi/Xiao_RP2040_UWB-BU01_Anchor-Node
sharing just the board design
(doc in progress)

design inspired from Makerbase's commercial board
16:26:46 Von Patrick-waag an Alle: Replying to "Real-time 3D cube with Bluetooth Low Energy (BLE) ...": I did Bluetooth Mesh
16:26:47 Von Milliam an Alle: Replying to "https://github.com/saheenpalayi/Xiao_RP2040_UWB-BU...": https://youtu.be/uj68drAjIRo
16:26:56 Von Milliam an Alle: Replying to "https://github.com/saheenpalayi/Xiao_RP2040_UWB-BU...": Example with the UWB module
16:27:36 Von Rico Kanthatham an Alle: we think it would be a lovely feature for FMCU!! Mkhitar Evoyan, Adrián - Fab Lab León, Doaa El-Bess, saheen palayi, Frosti Gíslason - Iceland- Vestmannaeyjar - Fab Lab, Jesal Mehta, Svavar Konradsson Fab Lab Isafjordur:❤️ Milliam, Patrick-waag:😂 Frosti Gíslason - Iceland- Vestmannaeyjar - Fab Lab:😎
16:28:10 Von Patrick-waag an Alle: Replying to "On lab management - as part of an undergraduate pr...": I can help for FabMan
16:28:18 Von Garrett Nelson an Alle: That's funny
16:28:28 Von Mkhitar Evoyan an Alle: Its Amazing!!
16:29:03 Von saheen palayi an Alle: Replying to "https://github.com/saheenpalayi/Xiao_RP2040_UWB-BU...": @Milliam yea Saw this, saving for interfacing week lets see
16:29:13 Von Pablo Fab Lab León an Alle: 👏
16:29:16 Von Terence Fagan an Alle: Replying to "https://github.com/saheenpalayi/Xiao_RP2040_UWB-BU...": Great Job! saheen palayi:🙌
16:29:20 Von Milliam an Alle: Replying to "https://github.com/saheenpalayi/Xiao_RP2040_UWB-BU...": It works really well.
16:29:57 Von Milliam an Alle: Replying to "we think it would be a lovely feature for FMCU!!": We could have blinking lights on the FMCU globe sites Adrián - Fab Lab León:😅
16:30:06 Von Forrest O. an Alle: I2C looks like morse code when you zoom in with the logic analyzer.
16:30:18 Von Garrett Nelson an Alle: My understanding wasn't that the sending was the problem, but the receiving. As someone has to hear it and interpret it.
16:30:40 Von saheen palayi an Alle: You need to have a license for that
armature Radio (HAM)
16:30:43 Von Frosti Gíslason - Iceland- Vestmannaeyjar - Fab Lab an Alle: amazing
16:30:56 Von Rico Kanthatham an Alle: Replying to "we think it would be a lovely feature for FMCU!!": update the FMCU button module with a morse code tapper, LED and buzzer Claire: Lake Mac Libraries Fab Lab:😁 Marius Araújo:😅
16:31:23 Von Milliam an Alle: Replying to "we think it would be a lovely feature for FMCU!!": DO IT!
16:31:42 Von Rico Kanthatham an Alle: Replying to "we think it would be a lovely feature for FMCU!!": done!
16:31:57 Von Milliam an Alle: Replying to "we think it would be a lovely feature for FMCU!!": Documentation~? Patrick-waag, Adrián - Fab Lab León, Claire: Lake Mac Libraries Fab Lab, Hiroe Takeda:🤣 Rico Kanthatham:🫣
16:32:01 Von Matthias an Alle: https://www.morserino.info/
16:32:16 Von henk an Alle: Replying to "Real-time 3D cube with Bluetooth Low Energy (BLE) ...": so show it'
16:32:17 Von Jeremy Losaw an Alle: mega
16:32:30 Von take an Alle: Replying to "Real-time 3D cube with Bluetooth Low Energy (BLE) ...": beautiful board!
16:32:48 Von saheen palayi an Alle: Replying to "we think it would be a lovely feature for FMCU!!": @Rico Kanthatham
16:32:58 Von saheen palayi an Alle: Replying to "we think it would be a lovely feature for FMCU!!": {45F42187-EDF3-4945-B869-8A5CE930622C}.png Adrián - Fab Lab León, Milliam, Rico Kanthatham, Camila Luna, Hiroe Takeda, Claire: Lake Mac Libraries Fab Lab, Mkhitar Evoyan, FabLab ESAN:😂
16:33:29 Von Matthias an Alle: https://morserinoshop.site44.com/availability.html
16:35:25 Von Superfablab Kochi an Alle: Replying to "we think it would be a lovely feature for FMCU!!": "Document that as well" - Saheen
16:35:46 Von Superfablab Kochi an Alle: Replying to "we think it would be a lovely feature for FMCU!!": IMG20250409200346.jpg Rico Kanthatham:🩵
16:40:26 Von Rico Kanthatham an Alle: .... .. --. .... .....
@Superfablab Kochi
16:46:24 Von Superfablab Kochi an Alle: Replying to ".... .. --. .... ..... @Superfablab Kochi": .... .. --. .... .....
16:46:46 Von Patrick-waag an Alle: is it normal that it is just ~minutes and no actual minutes ?
16:46:48 Von Patrick-waag an Alle: {C426B063-9775-4F33-9C42-12C8BB0E9EC2}.png
16:47:20 Von saheen palayi an Alle: Replying to ".... .. --. .... ..... @Superfablab Kochi": @Rico Kanthatham .... .. --. .... ..... / .-. .. -.-. ---
16:48:04 Von Forrest O. an Alle: Replying to "{C426B063-9775-4F33-9C42-12C8BB0E9EC2}.png": “approximately” tilde
16:48:34 Von Patrick-waag an Alle: Replying to "{C426B063-9775-4F33-9C42-12C8BB0E9EC2}.png": ah thx
16:51:26 Von Rico Kanthatham an Alle: @ChaiHuo Makerspace Matthew Taobao for machine parts? Superfablab Kochi:😂
16:54:54 Von Patrick-waag an Alle: for gear creation https://geargenerator.com/#200,200,100,6,1,3,0,4,1,8,2,4,27,-90,0,0,0,0,0,0,16,4,4,27,-60,0,0,0,0,1,1,12,1,12,20,-60,0,0,0,0,2,0,60,5,12,20,0,1,0,0,0,0,0,3,-515 Rico Kanthatham, Lei Feng:🩵
16:55:58 Von Rico Kanthatham an Alle: For Linkage design https://blog.rectorsquid.com/download-linkage/
16:56:51 Von Dylan Heneck an Alle: Screenshot2025_04_09_165644.jpg Camila Luna, Patrick-waag, Enterprise fablab, Oscar, Rico Kanthatham, Adrián - Fab Lab León, Doaa El-Bess, Mkhitar Evoyan, Jesal Mehta, Milliam, Pablo Fab Lab León, Geovanny Fortín:😂
16:57:34 Von Patrick-waag an Alle: Replying to "Screenshot2025_04_09_165644.jpg": you are savage with Niels drawings XD Dylan Heneck:😇
16:57:55 Von Patrick-waag an Alle: Replying to "Screenshot2025_04_09_165644.jpg": {7F786513-6917-40AB-9CB5-3FCCDB22B936}.png Camila Luna, Adrián - Fab Lab León, Norella Coronell, Dylan Heneck:😂
16:58:02 Von henk an Alle: Replying to "@ChaiHuo Makerspace Matthew Taobao for machine par...": we should make a vendor list thats not affected by Trump's trade war Patrick-waag, Marius Araújo:💀
16:58:03 Von Dylan Heneck an Alle: Replying to "Screenshot2025_04_09_165644.jpg": never forget
17:02:10 Von Patrick-waag an Alle: do not forget the basic engineering rules
17:02:15 Von Patrick-waag an Alle: Replying to "do not forget the basic engineering rules": wd40-flowchart.jpg Dylan Heneck, Nicolas De Coster:👍 Camila Luna, Doaa El-Bess, Marius Araújo:😂
17:02:48 Von Sam an Alle: Replying to "do not forget the basic engineering rules": If it aint broke don't fix it Patrick-waag, Dylan Heneck:👆 Camila Luna:😂
17:03:47 Von Garrett Nelson an Alle: 23 minute video on different types of washers and their uses: https://www.youtube.com/watch?v=F4EvMVpx1Pw
17:04:37 Von Patrick-waag an Alle: Replying to "23 minute video on different types of washers and ...": how can you do a 20min video on such a simple thing ?!
17:05:31 Von Garrett Nelson an Alle: Replying to "23 minute video on different types of washers and ...": Cause it ain't that simple. 😃 Pérez De La Mora Daniel Alejandro:👍
17:07:55 Von henk an Alle: Replying to "do not forget the basic engineering rules": gaffer.jpeg Patrick-waag:😆
17:08:33 Von Rico Kanthatham an Alle: Replying to "do not forget the basic engineering rules": "if you can't fix it with duct tape...you aren't using enough duct tape!" Patrick-waag, Marius Araújo:👆 Geovanny Fortín, Evert , Camila Luna, Tshering Dorji JNWSFL:😂
17:15:28 Von Jani Ylioja an Alle: Good explanation of cycloidal gear: https://www.tec-science.com/mechanical-power-transmission/cycloidal-gear/geometry-of-cycloidal-gears/ Patrick-waag, Garrett Nelson:👍 Frosti Gíslason - Iceland- Vestmannaeyjar - Fab Lab:😎 Rico Kanthatham:🙏
17:22:01 Von jakob an Alle: is a thrust a type of linear bearing?
17:23:15 Von jakob an Alle: ah alright thanks
17:26:43 Von saheen palayi an Alle: V groves bearings uses in Bambu lab A1 Series Printers ( Y axis) https://www.vertex3d.co/shop/fac027-a1-mini-y-axis-track-bearing-2284#attribute_values=30,749,1071
17:27:58 Von Svavar Konradsson Fab Lab Isafjordur an Alle: A way to 3D print cable carriers onto mesh: https://fab.cba.mit.edu/classes/865.24/people/svavar/components/cable_carrier/ Andrr - Fab Lab Reykjavik, Doaa El-Bess, Marius Araújo, take, Frosti Gíslason - Iceland- Vestmannaeyjar - Fab Lab, saheen palayi:❤️ Patrick-waag:🤔
17:28:03 Von saheen palayi an Alle: Replying to "V groves bearings uses in Bambu lab A1 Series Prin...": https://wiki.bambulab.com/a1/maintenance/y-axis/y_assembly.jpg
17:41:04 Von saheen palayi an Alle: Replying to "A way to 3D print cable carriers onto mesh: https:...": drag chain ❌ Flex chain ✅
17:42:41 Von ferdi an Alle: Is that true? Ted Hall, the founder and chairman of ShopBot Tools, has a background in neuroscience. He served as a professor and research scientist at Duke University. Marius Araújo:🫨
17:43:12 Von ferdi an Alle: Thank you!
17:43:25 Von Garrett Nelson an Alle: That explains so much about shopbot to me.
17:43:30 Von jakob an Alle: would you use MPC for something as "simple" as a motor driving a linear mechanism (like something sliding a rod)?
i could imagine that a PID controller is a bit "easier" to set up since one needs a model of the machine...

What would you suggest for "daily practice"?
17:44:38 Von Enterprise fablab an Alle: Is MPC the same as input shaping?
17:45:57 Von Garrett Nelson an Alle: Would MPC allow easier sensor fusion?
17:46:33 Von Hiroe Takeda an Alle: Great idea / Machine project / Fab Academy 2023 Sausage cutting machine TEA MANATOR Easter Egg Shooter Adrián - Fab Lab León, Andrr - Fab Lab Reykjavik, Svavar Konradsson Fab Lab Isafjordur, olof, saheen palayi:❤️ Shoko K:👀
17:48:10 Von jakob an Alle: Replying to "would you use MPC for something as "simple" as a m...": thank you!
@Neil which algorithms/models would you suggest for identifying a model?

I know for basic stuff there are ARMAX, Box-Jenkins etc. and for non-linear systems one might use LSTMs

But i have no practical experience with that so i would appreciate some hints what is state of industry :)
17:51:16 Von Adrián - Fab Lab León an Alle: UGS
17:51:26 Von saheen palayi an Alle: CNC JS
17:51:31 Von Jani Ylioja an Alle: kirimoto Adrián - Fab Lab León:❤️
17:51:41 Von Jani Ylioja an Alle: grblgru
17:56:30 Von saheen palayi an Alle: A Machine project from Kerala Fabacademy 2025 using Urumbu https://fabacademy.org/2024/labs/kochi/machine_week/Cut-Urumbu/
cut - Urumbu ( fire ants)

Board used :- https://github.com/saheenpalayi/Urumbu_Project-SMD11C_DRV8825
Hiroe Takeda:❤️
Adrián - Fab Lab León:💕
18:00:23 Von Adrián - Fab Lab León an Alle: Remember, Global Open Time returns this Saturday, 10:00 AM Boston Time. More info: https://chat.academany.org/fabacademy-2025/channels/global-open-time Camila Luna, saheen palayi:❤️
18:00:26 Von saheen palayi an Alle: To the concept of the Fab Labs making Machines for Fablabs
sharing an on going development from SuperFabalab Kochi
https://www.youtube.com/watch?v=gib4u8rVf-w

this is a machine with 6 multi color pen support that plot pictures and drawings in color
18:01:36 Von saheen palayi an Alle: Replying to "To the concept of the Fab Labs making Machines for...":
The objective of this project is to design a
beginer-level, intuitive and safe CNC machine,
emphasizing STEAM principles and ease of use.
Tailored for schools, it aims to engage students and
provide an accessible entry into digital fabrication,
with teachers offering support.


the future to the machine is adding a drag knife
18:01:41 Von Pablo Fab Lab León an Alle: Tell this to Kerala...no spectacular machine 🤣 saheen palayi:😁 Jarni Rai Castillo Yarlequé, Adrián - Fab Lab León, Patrick-waag, Superfablab Kochi, Rico Kanthatham:😂
18:02:24 Von Jarni Rai Castillo Yarlequé an Alle: Replying to "To the concept of the Fab Labs making Machines for...": Right
CNC mill JarBeRi
CNC Mill by Jarni, Benedik, Richard
Checklist:
- Sunday:
- cut 8mm rods
- finish sled design for X and Y Axis
- Goal for the day:
- assemble X-Axis
- manually move X-Axis
- Monday:
- test assemble electronics
- test firmware
- move motors with firmware
- design end stops
- Goal for the day:
- assemble Y-Axis with work bed
- manually move Y-Axis
- Tuesday:
- Goal for the day:
- finish machine
- Goal for the day:
- Wednesday:
- Goal for the day:
- Film, finish documentation
- reflect on personal pages
- Goal for the day:
Workflow:
Links:
https://cloud.tu-ilmenau.de/apps/files/files/104312242?dir=/Benutzer/CNC%20JarBeRi
3D modeling:
- Everyone is working on their subassemblies.
- Work in private directories
- Upload versions to the shared folder
Design decisions:
General
Standart PCB Sizes:
- metric: 150mm*100mm
- imperial: 127,38mm*102mm (5inch * 4inch)
Material Goals:
- PCB milling very precise
- 0,4mm traces
- Engrave stone
- soft limestone
Work Table (fixed)
- 160mm*120mm
- 15mm? height
Outer Dimensions: (might change based on final design)
- 350mm width
- 300mm depth
- ? height
https://service-manual.ons.gov.uk/content/language/nouns
Mechanical:
Y-Axis: (Jarni)
- leadscrew: trapezoidal thread T8
- two T8 nuts countered for minimal backlash
- new stepper + axle coupling
- preferred: prusa stepper axle assembly
- bushing for trapezoidal axle
- guiding rods
- 8mm
- linear bearings
- sled
- 3d printed part, maybe milled aluminium
- support structure for lower bed
- interface plate
- holes for T-Slot nuts
- friction fit for guiding rods
X-Axis: (Benedikt)
- leadscrew: trapezoidal thread T8
- two T8 nuts countered for minimal backlash
- new stepper + axle coupling
- preferred: prusa stepper axle assembly
- bushing for trapezoidal axle
- guiding rods
- 8mm
- linear bearings
- sled
- 3d printed part
- connected to z-axis
- interface plate
- holes for T-Slot nuts
- friction fit for guiding rods
Z-Axis:
- manual adjustment with screws
- flexure mechanism
Machine Bed (work table):
- upper bed: (waste board)
- HDF/MDF
- screw holes for fixturing?
- lower bed: steel or aluminium
- connect upper bed and lower bed with screws
Spindle and Spindle Mount:
- which BLDC motor?
- brushed motor from Ferdi
- BLDC motor
- treaded inserts for the mount
- spindle collet
- high strength ABS 3d print
- mill out of aluminium
Frame:
-
use existing: ITEM Profile 6 30mmx30mm (0.0.419.06)
-

-
vertical: 60*30 extrusion
-
horizontal: 30*30 extrusion
-
additional support by steel wires for structural rigidity
-
T-Nuts

Electric:
- human interface
- housing
- display
- power
- lab bench powersupply
- cables
- Motors
- Stepper Motor
- plugs
- mechanical coupling
- Spindle Motor
- BLDC
- BLDC driver board
- Stepper Motor
- Endstops
- microswitches
Software:
- search for:
- Arduino mega software
- motor drivers libraries
- uns Fusion360 for 3D model -> nc code
Project Progress / Documentation:
First Idea to Sketch:
On Thursday, the day after the Mechanical Design and Machine Building lecture we decided to form groups in our local lab. It wasn't easy to form a group in the first place but after longer discussion we formed a group of three: Jarni, Benedikt and Richard.
We wanted to build a use full tool for our lab and get some redundancy for our existing CNC the Carvera Makera. Machines often have issues or have downtime due to maintenance thats why it is use full to have a backup if something goes wrong with the Carvera mill. For us building a X-Y-Z computer controlled coordinate system was a completely new topic, what made this project exiting in the first place. We took our existing machines in the lab as a reference and did some research online about homemade CNC's. We checked the following:
- Carvera Makera
- Prusa MK4s printers
- Pico V2 milling machine
- Ferdis existing knowledge on CNC's
We did our Idea sketches patially in CAD software (Autodesk Inventro) and partially in 2D sketching software (Goodnotes). 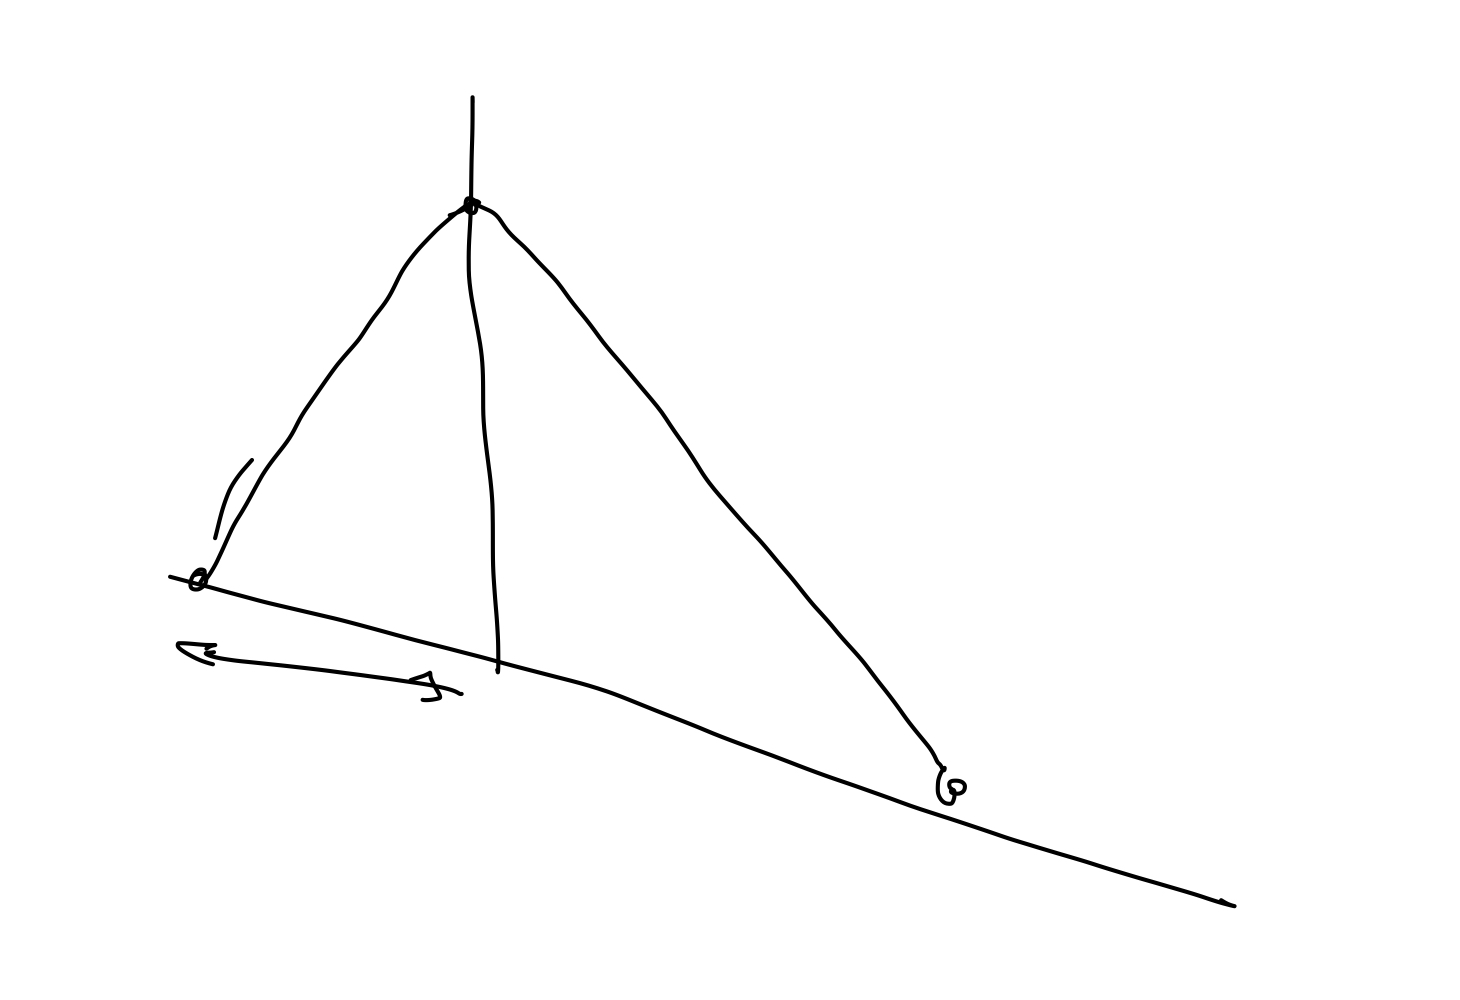

Idea Sketch to Mechanical design:
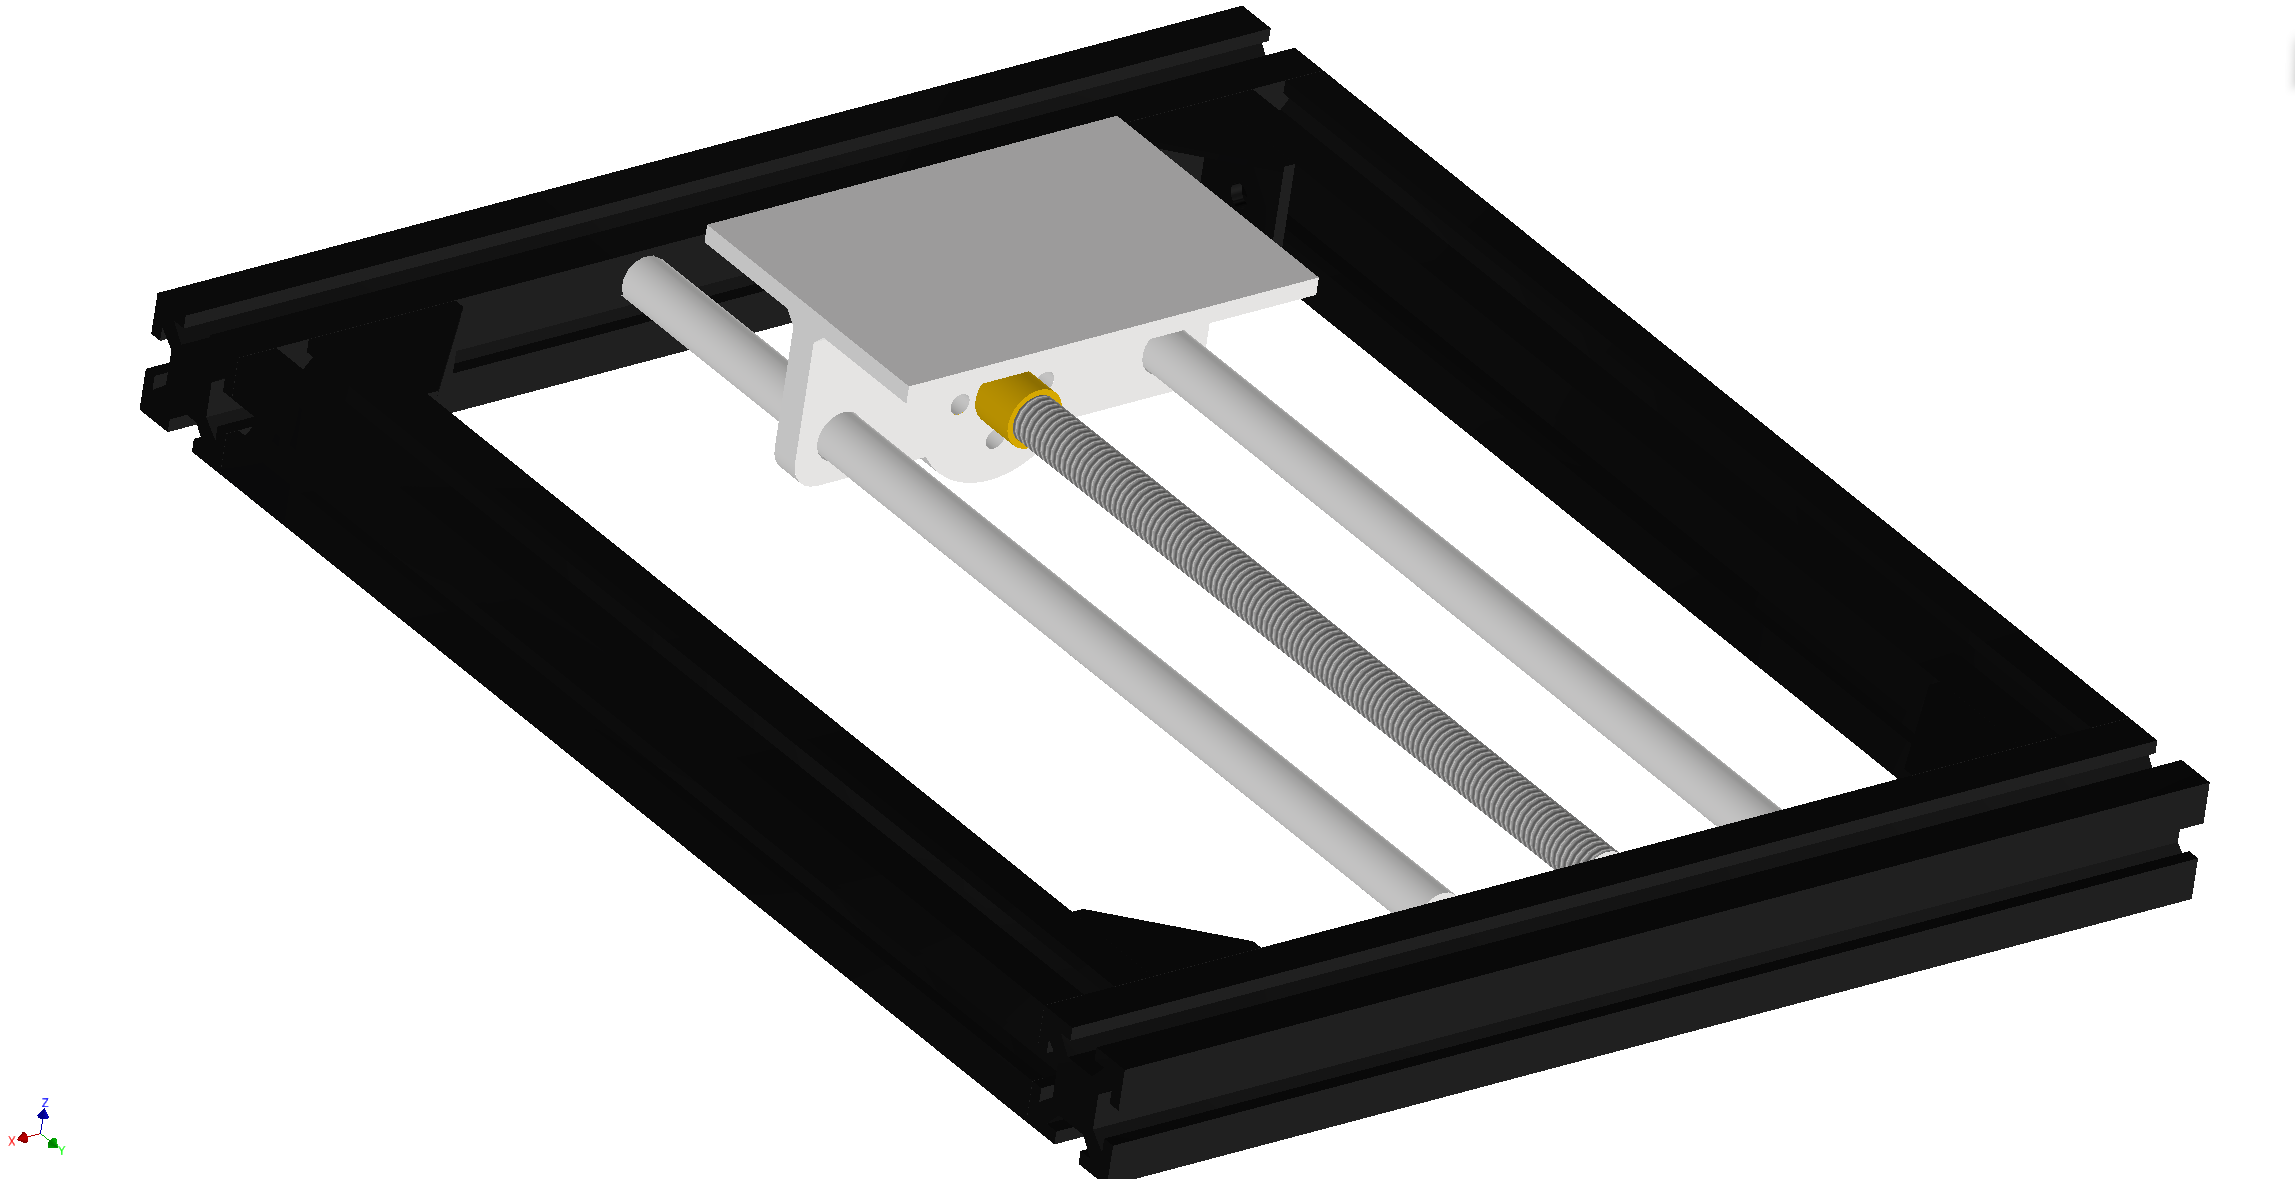
First Design:
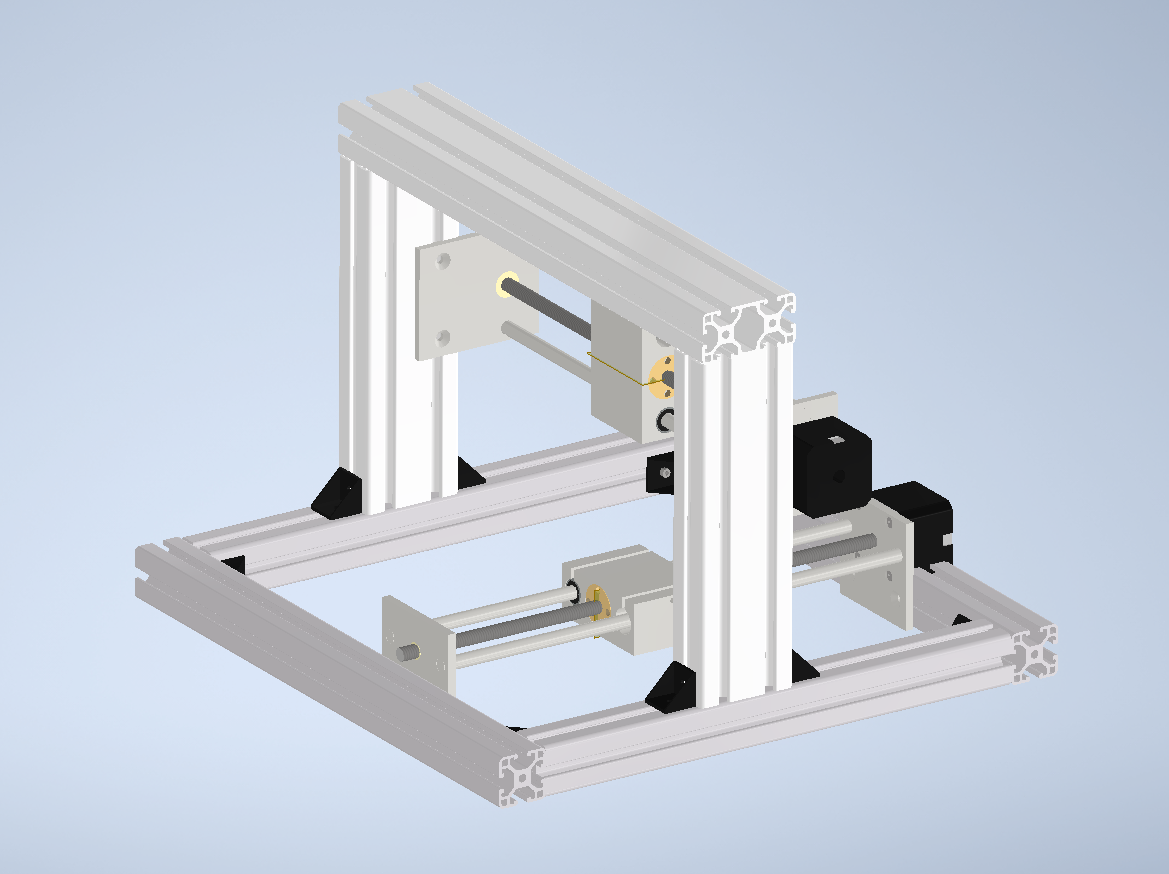
This is the first 3D Design Jarni and Benedikt made. It features already the main two Axis X and Y with the T8 screw nuts, sleds, rods and stepper motors. Now it was time to test some parts of the design with the 3D printer!
The test print showed some assembly issues we had If we wanted to use threaded inserts.
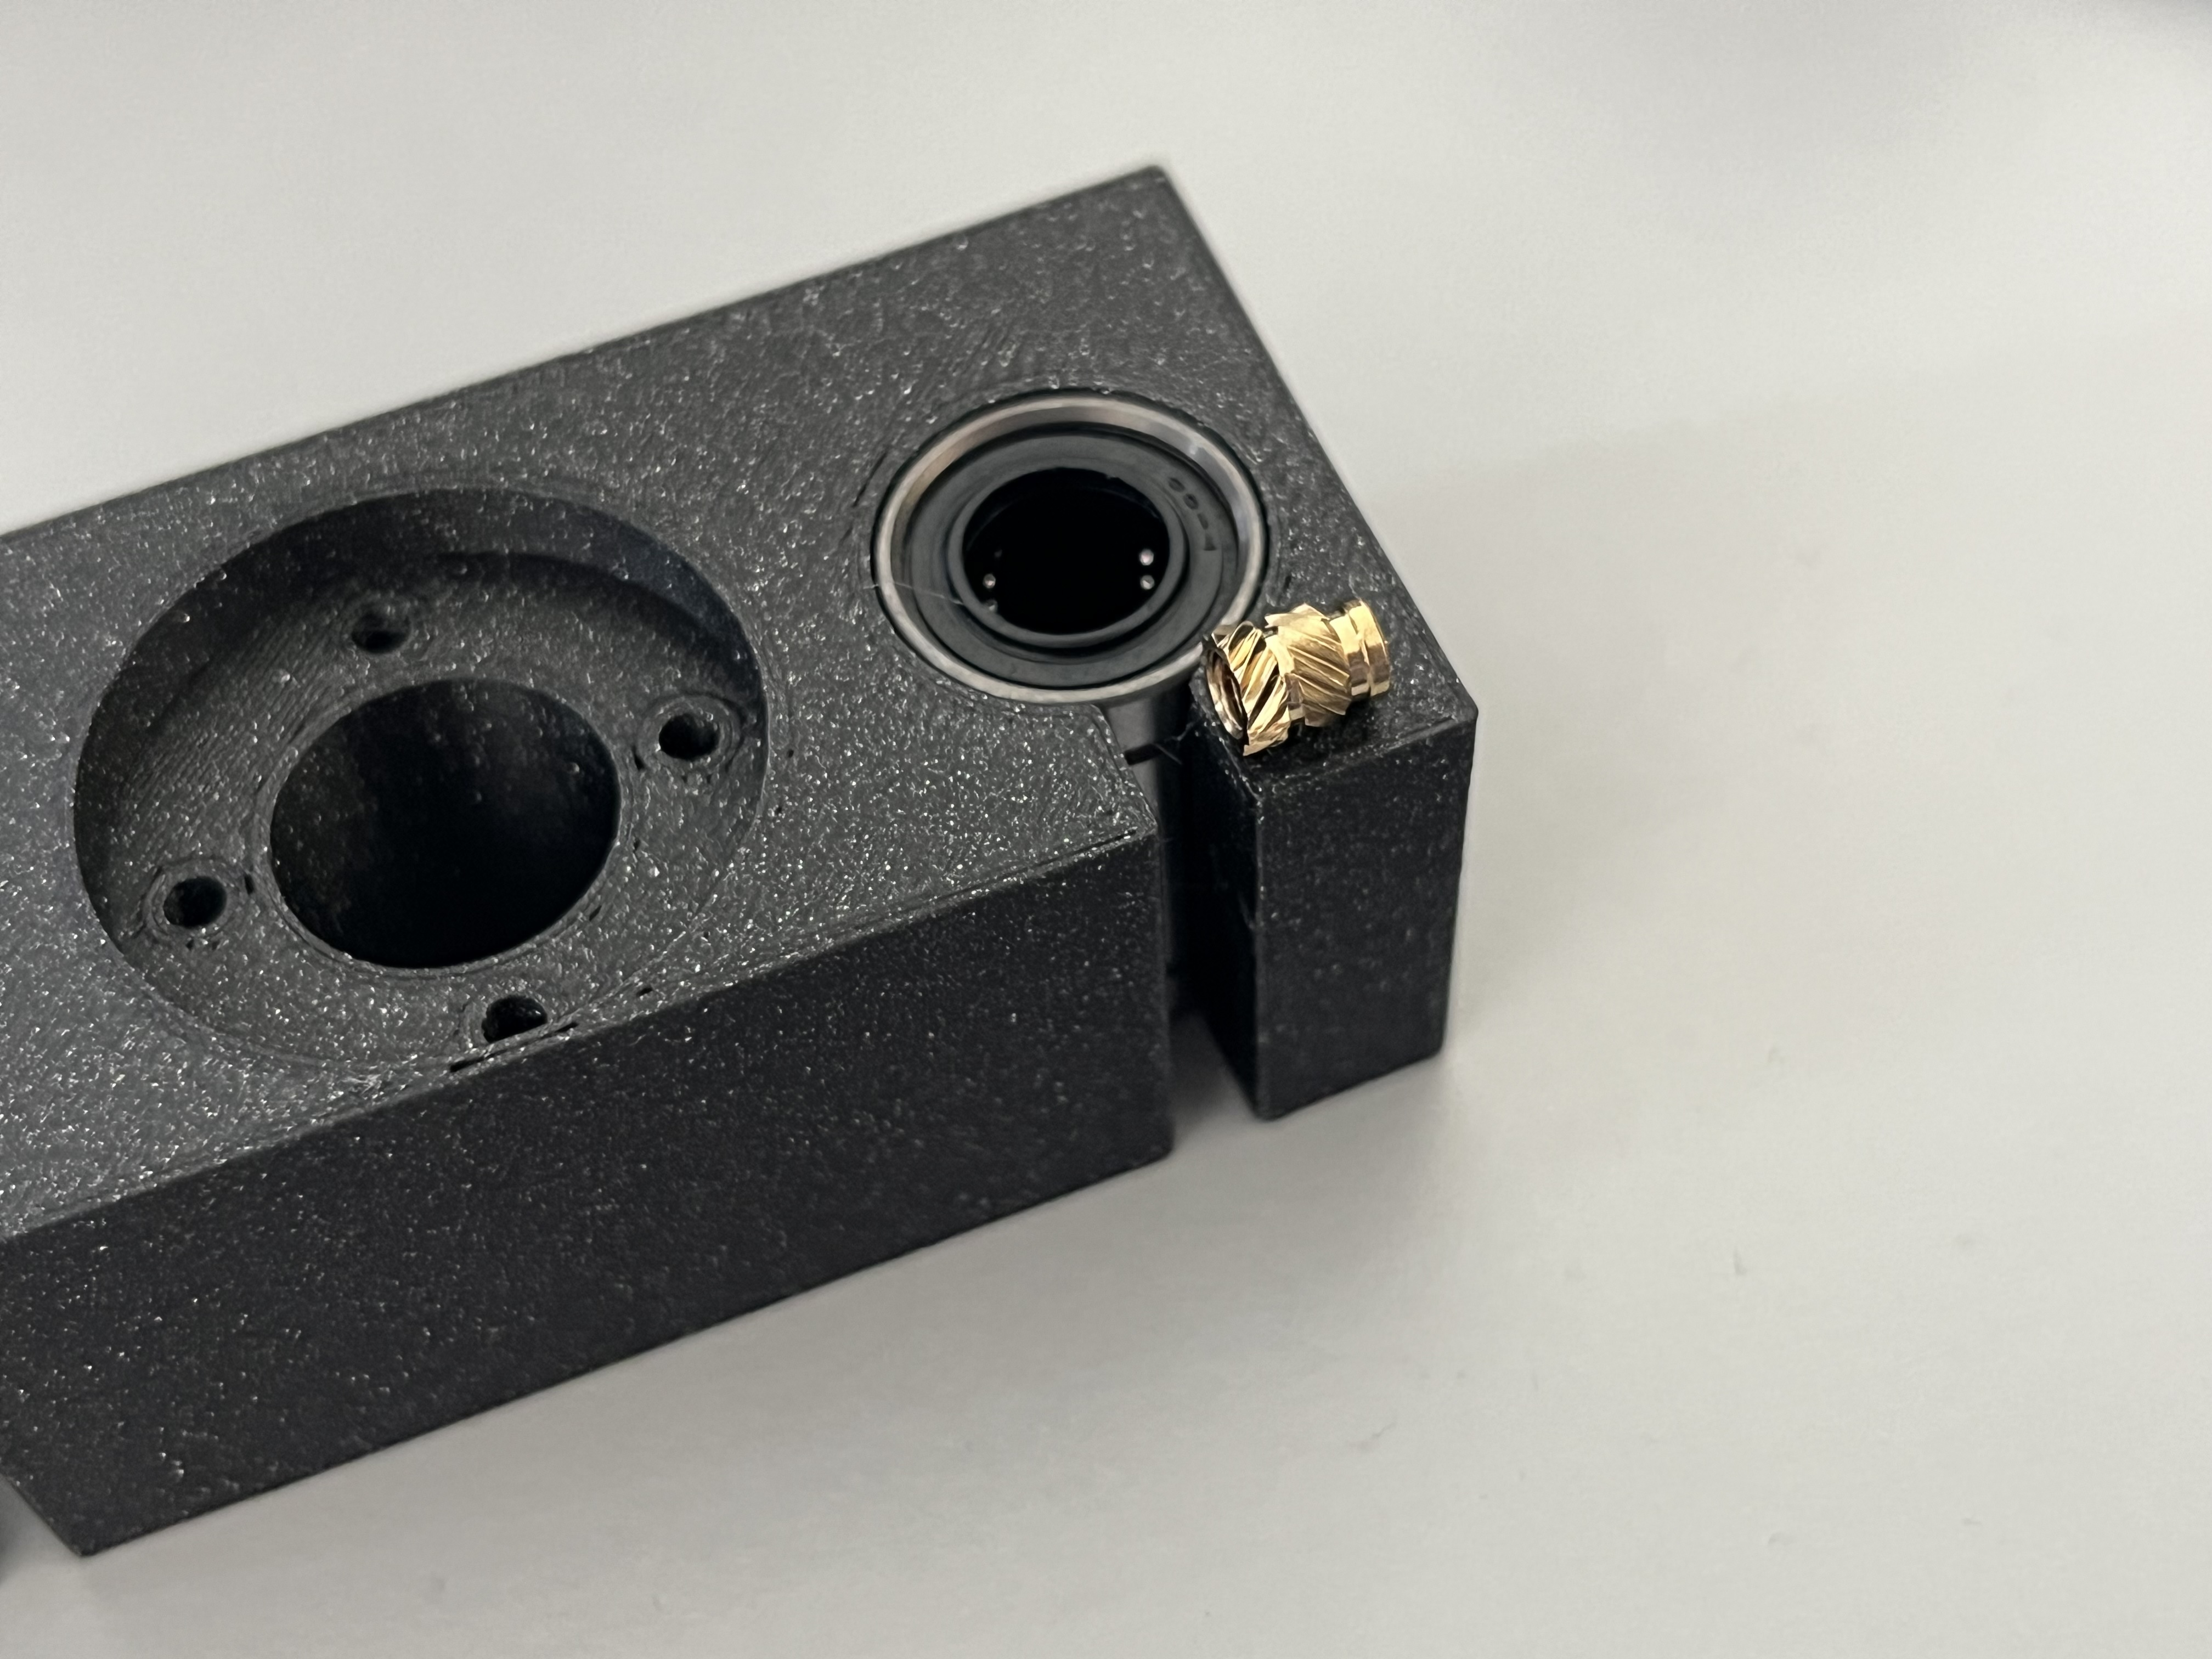 (V1)
(V1)In the second iteration Jarni added some more material and the ability to add threaded inserts.
-> instert picture here
(V2)
right screws for version V3: M3 20mm or 30mm
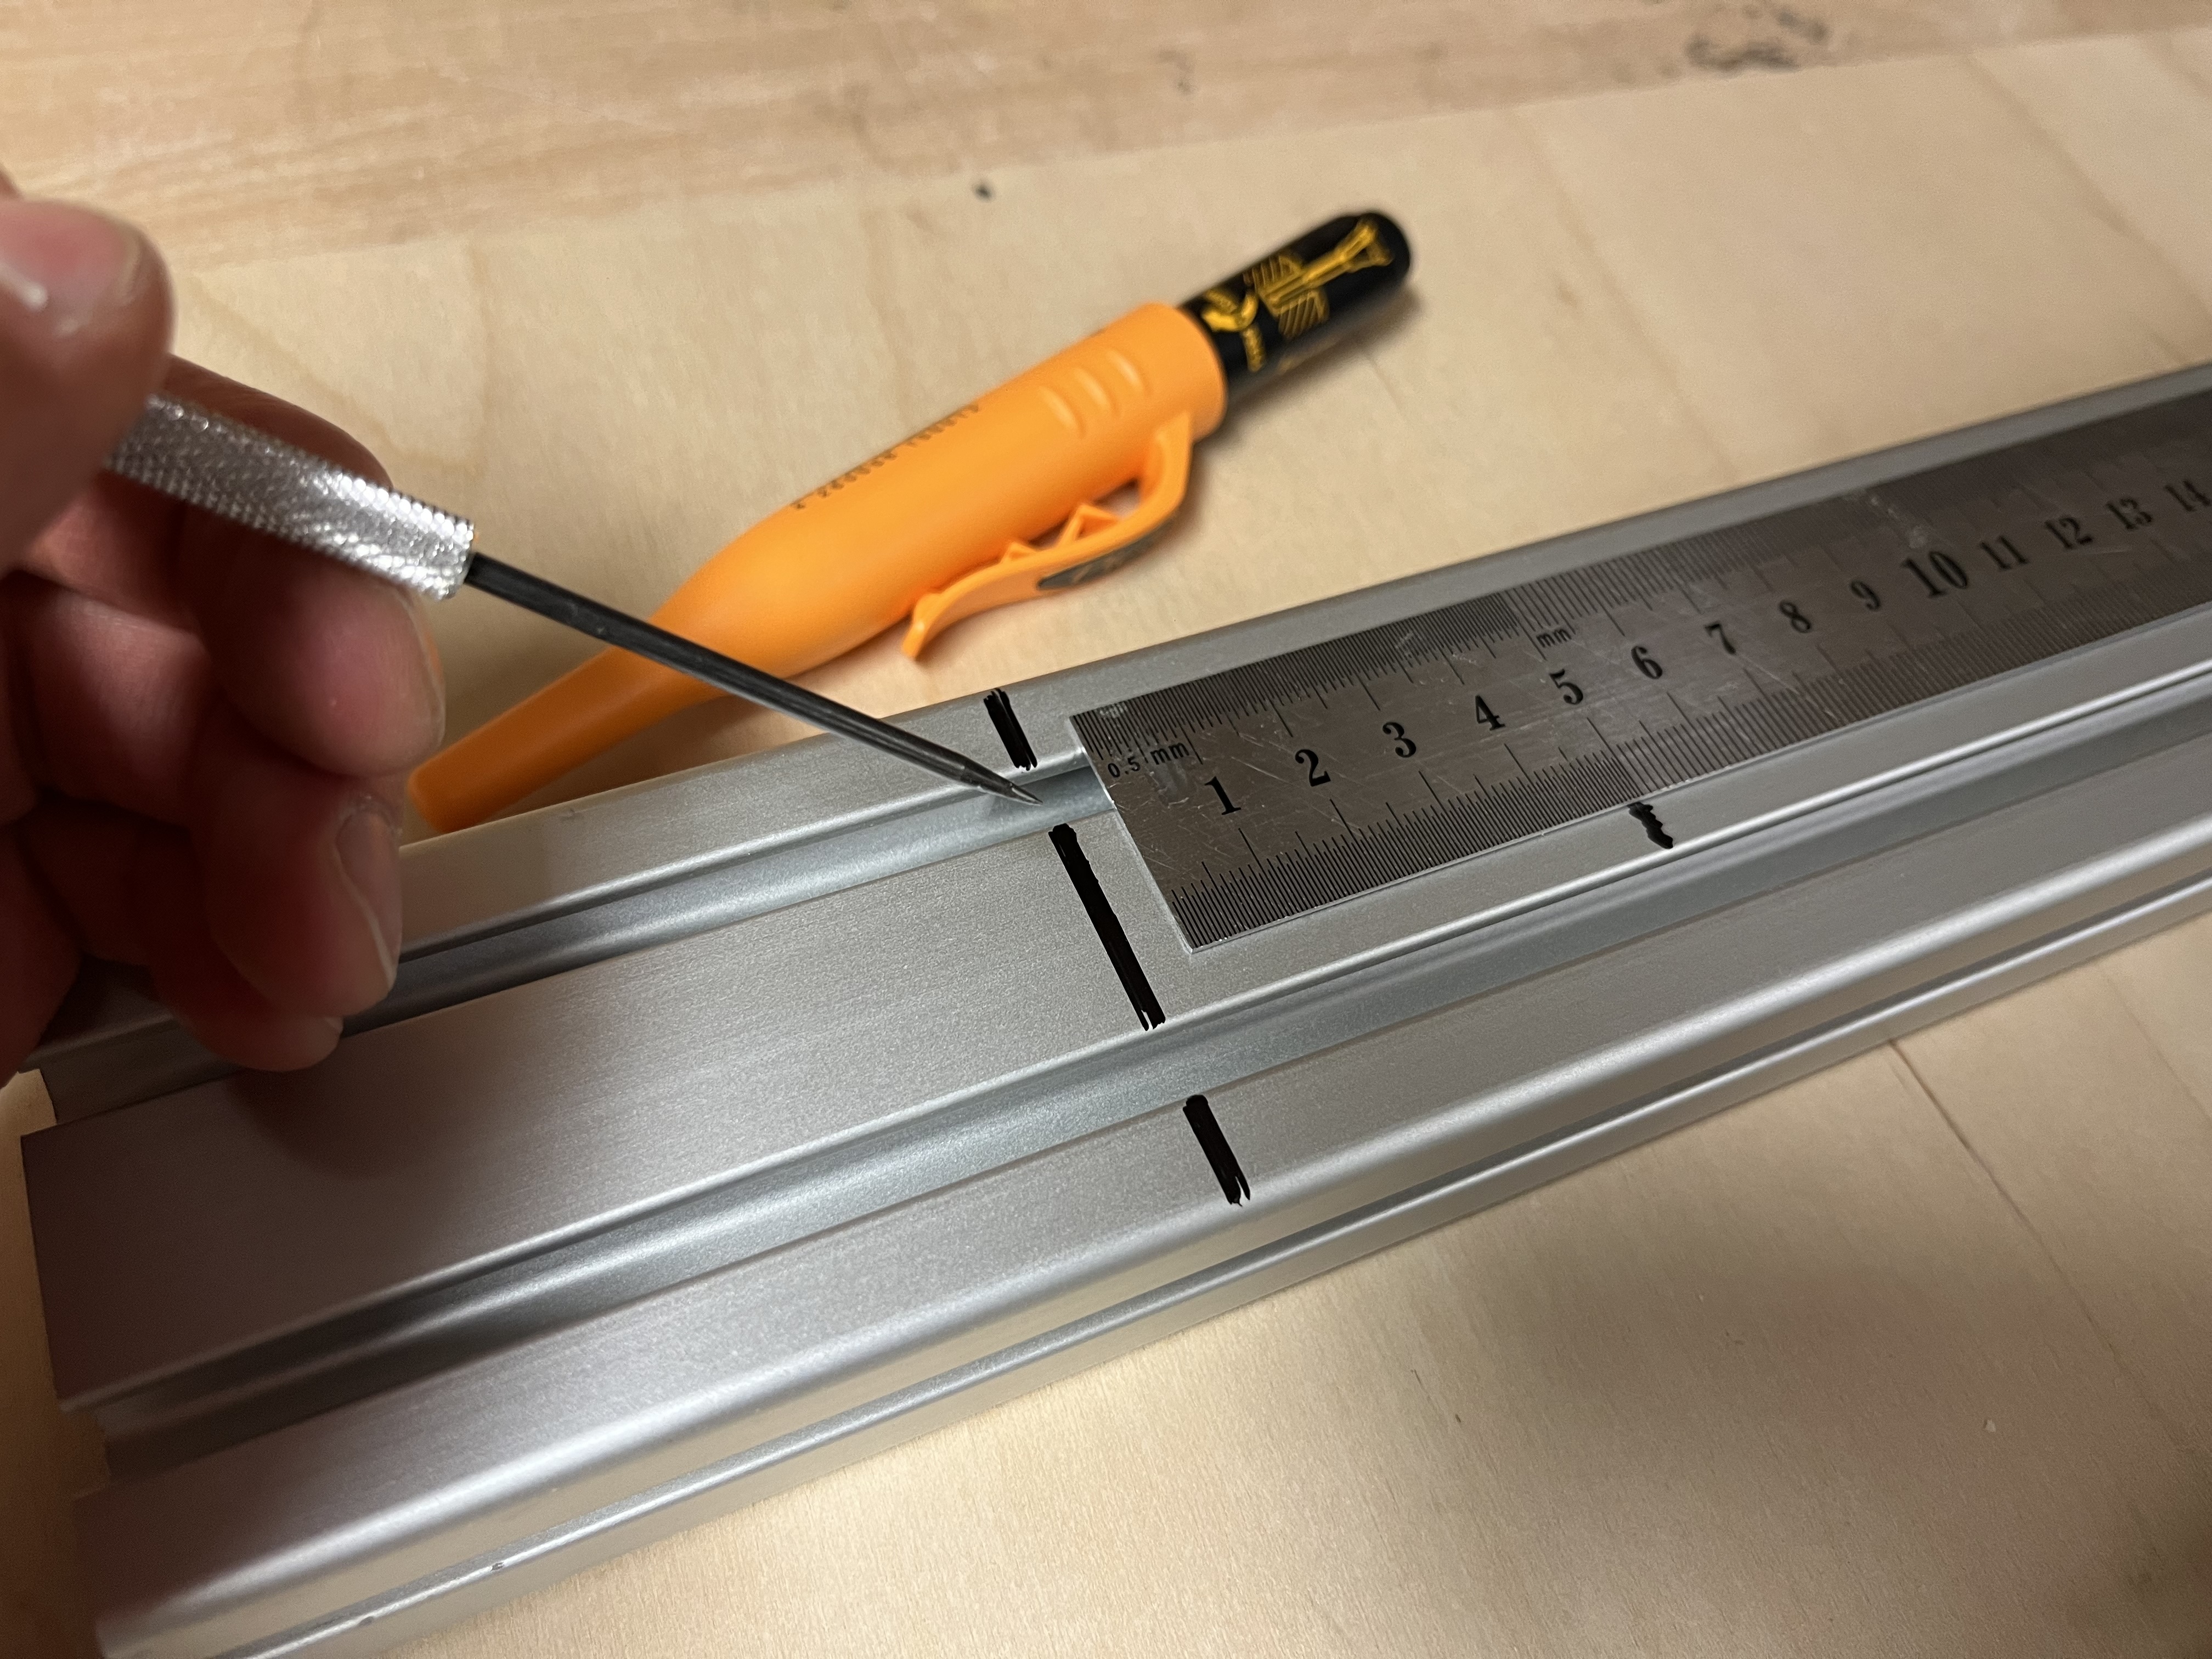
Cutting the Extrusion
- 30*30mm
- 2X 300mm
- 2X 360mm
- 30*60mm
- 2X 250mm (currently 200mm in cad design)
- 2X 360mm
Cutting the extrusions did not turn out to be easy because they needed to be exact in length and right-angled. The tool we used for cutting was the plunge saw with a blade for aluminium. After measuring, marking and setting everything up the actual cutting process was very quick!
Y-Axis: (Jarni)
Electrical and Software Design:
For the electronic components we relied on the RapRep parts.
What ist RapRep? RepRap is humanity's first general-purpose self-replicating manufacturing machine.
RepRap is openSource software and hardware framework that has many derivitives and versions. For our project we used the standart RAMPS 1.4 board and a Arduino Mega.
RAMPS board
We used the official documentation of the RapRep
Functions we need:
- Endstops
Functions we do not need:
- Heat bedcontrol
- Hot endcontrol
Endstops
official Wiki RepRap - Endstops
RAMPS 1.4 offers no pull-up circuits, current limiting resistors or other protections.
Wiring improperly an endstop that uses **5V** may damage an IO port on the ATmega 2560 or the Arduino itself, this is a particular issue with clones of the Arduino ATmega2560.
- put pull up and pull down resistors close to the board
In firmwares a setting is available to enable or disable built-in pull-ups, for example in Marlin you have the ENDSTOPPULLUPS constant in configuration.h, this option is enabled by default.
- different Endstop versions are available
- usually PCB mounted
Motors are a common source of noise. Keep endstop wiring away from motors or use strategies like twisted cables or or used screened cables to reduce the noise.
Ferdi recomendend to use the simple endstop design without pull up because it is simple and just works.
Stepper:
The stepper cables should not be disconnected from the boards while powered on.
- For A4988 setting all the jumpers will set the micro stepping to 1/16 of a step
- Turn down trim poti to zero, open up to 25% as a start value for the motor current.
Firmware:
- use Marlin Firmware
- download the latest release
idea list:
component list: mechanical structural: - alu extrusion 20*20 moving: - 2x 8mm leadscrews with brass nuts - 4x 8mm guide rails - electrical: mechatronic: manufacturing methods:
- milling parts
Links:
- https://marlinfw.org/
dr4wbck
Idea
We wanted to build a drawing bot. We wanted it to be transportable to bring it to festivals. Assembly and Disassembly should be easy. Other drawing bots we found are listed below.
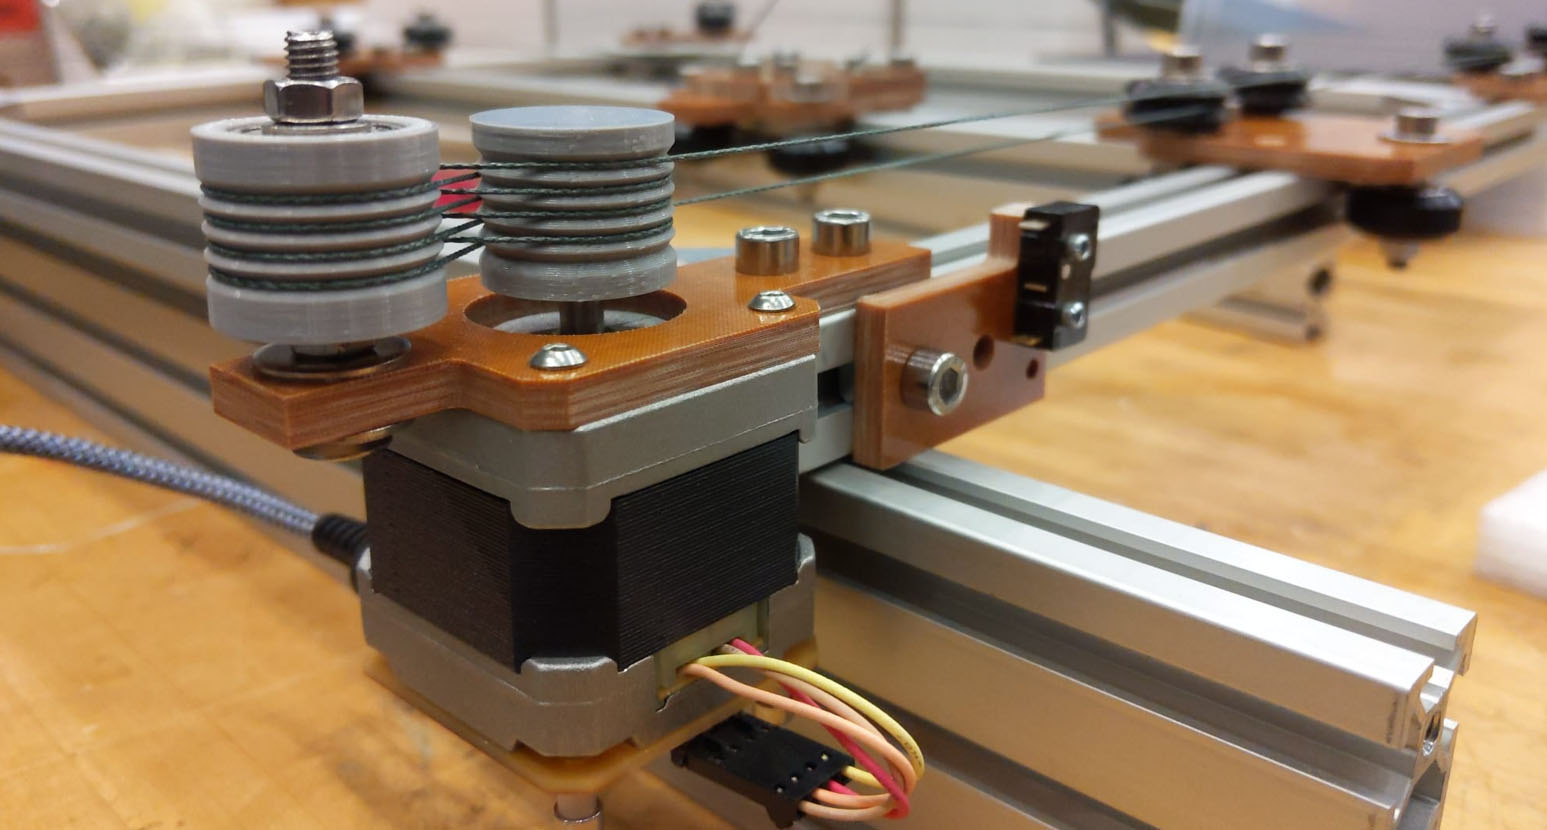
Most inspiration we drew from the AxiDraw, but we decided to use a capstan drive instead of a belt for driving. We just learned about this type of drive in the lecture and were eager try it out. The motion system would be an H-bot.
For the capstan drive, we took much inspiration from the UrumbotXY 2.0.
First, we met and thought about how to build the machine in general. We decided to use aluminum extrusions and wheels as linear guides. We made some initial sketches to better understand, how the machine whould look like and what parts we would need.

Here you can see the inital concept. The wheels for the linear guide as well as the v-wheels for guiding the rope are placed on the middle carriage and the rope is fixated at the head.

We split the work into the following sub tasks.
- Trying out RAMPS (a kit containing an Arduino for the firmware and drivers) and get it working with Printrun.
- Designing the parts for the tail
- Designing the motor mounts.
- Designing a head with a Pen holder and a mechanism to lift it.
- Producing and testing the prototypes and the parts needed.
Mechanism & Parts
Design
Our Instructor suggested the following workflow:
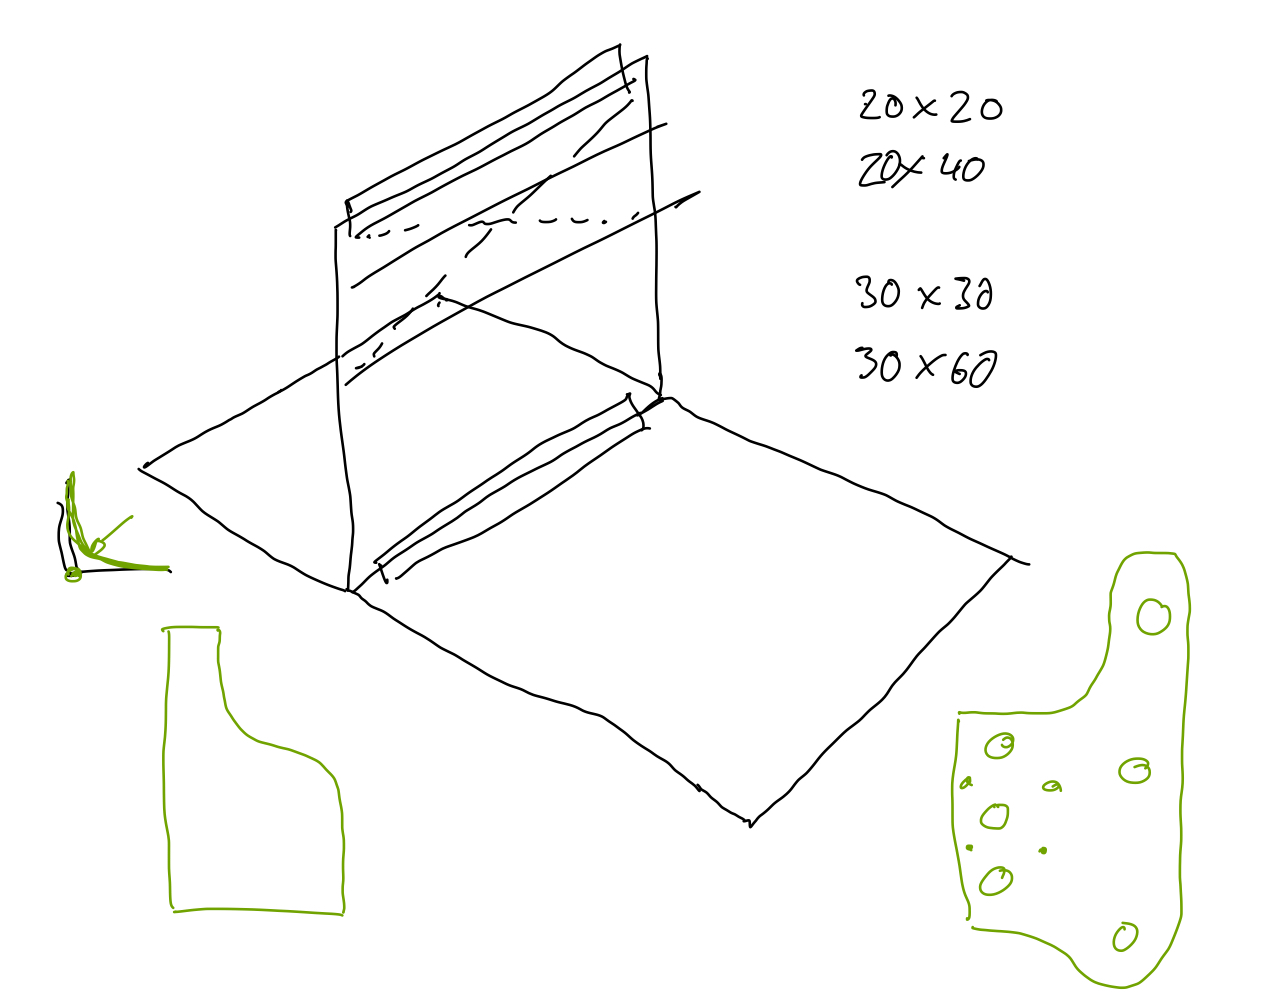
- Rapidly designing and and assembling a dummy prototype, either using cardboard or digitally, using Blender. The idea of this step is to have a rough sketch and to get an idea of the mechanism, dimensions, etc.
- Design every part (yes, every part) in a CAD software and assemble that exactly in the way we would assemble it later in reality. Following his experience, mistakes are mostly made with components that were not taken into account in the digital model previously.
- Iteratively fabricating the machine.
Due to us having less to no experience in machine building, we did not make to follow step one properly. Looking back, however, the sketch-making session at the beginning of the week helped us a lot with understanding what we want to do.
Our machine would consist of both standard parts (e.g. the aluminum extrusions, screws and bearings) and parts designed by us. The standard parts, we downloaded from various resources, such as GrabCAD and OpenBuilds. Most of the parts were retrieved by looking up another machine that uses extrusions and wheels for the guide and downloading the parts from there. For screws, we used the fasteners workbench extension for FreeCAD.
The initial design we kept simple so we could produce them fast and test out the mechanism. We built a flat motor bracket for connecting the motor to the extrusion:
We printed the capstan and pulley from the UrumbotXY 2.0 as well as a simple head.
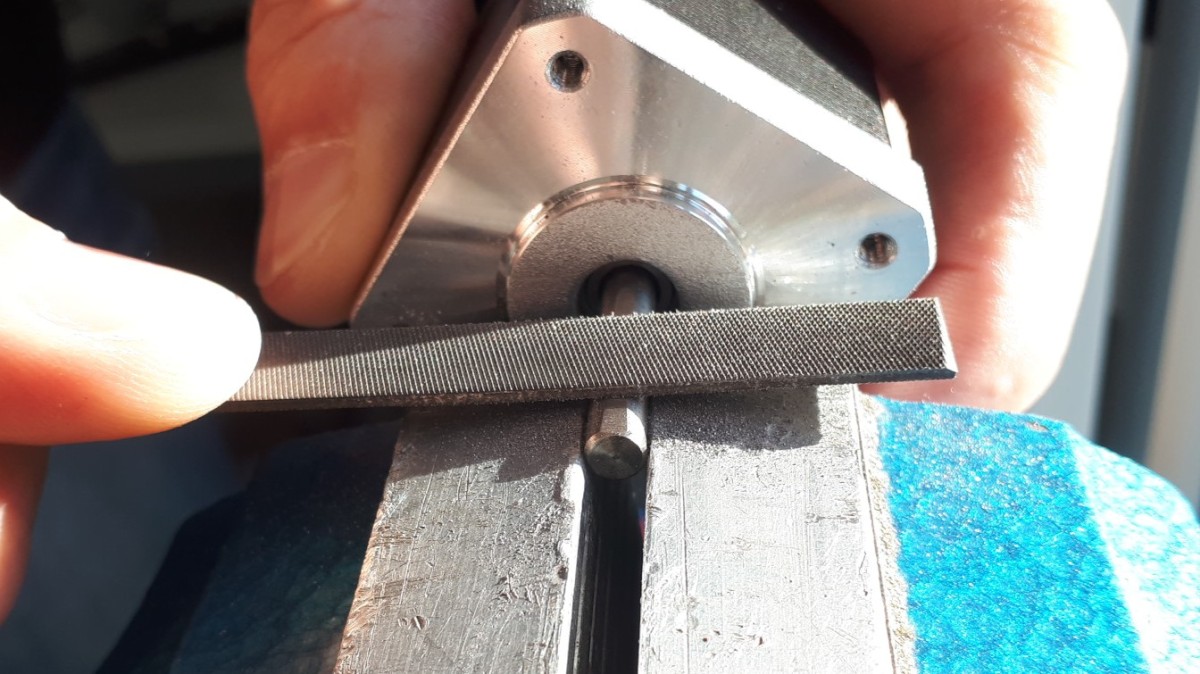
The motor axis we filed flat for the capstan to have a better grip.
The idea of the carriage was to have a plate and mount four wheels at its bottom and four wheels at its top to connect the horizontal and the vertical axis with each other. Additionally, we wanted to mount four v-wheels to guide the capstan thread. A plate for mounting the wheels we already had as a metal part. It was very sturdy, so we wanted to use it. However, it did not suffice to mount each of the wheels, so we designed a larger second plate to be mounted on top of the metal plate for mounting the other wheels.
A problem was that the wheels guiding the second axis and those guiding the top axis were mirrored in respect to each other, so the heads of the respective screws would have been very near to each other. Our instructor advised against that. We redesigned the carriage according to the feedback. It was at this time that we decided to use the eccentric screws to tighten the rope.
The tail was designed with one wheel. The wheel seen at the picture was substituted with a v-wheel later on.
Then we designed a new head with which we were able to fixate the capstan thread.
Apart from that we printed a cable chain we found at thingiverse to connect the head with the board. In the end we noticed, that the chain was not sturdy enough and that we could not use it for our machine. Due to time constraints we omitted it for this assignment.
Assembly & Manual Operation
Next, we assembled everything...
... cut threads, screwed everything down, assembled the capston drive rope...
... and operated it manually:
We were very happy that it worked because we were unsure about it and considered switching to a belt drive.
Re-Design
When we operated the mechanism, we needed to hold down the machine at its feet to prevent falling over. This was the first we improved.
First, just adding a little angle in the motor bracket as well as extending it to mount the motor in a more stable way reduced the oscillations, but did not avoid them completely.
Therefore, we added sideway stabilization as well. Furthermore, a mount for the end stop was added.
The improved head and the initial design for the pen mount can be seen below.

Besides the end stop at the foot, one also was added at the bottom of the head.

Also, a never-produced new cariage for mounting the cable chains to guide the cables from one of the feet to the head was designed.
Actuation & Automation
We now had a mechanism and motors driving it. The next step was to tell the motors what to do in order to draw a picture. This involed setting up a driver for the motor (a circuit that translates step signals into current flowing through the coils in the motor to make it move), a software that sends step signals to the drivers based on given machine code (referred to as firmware), a GUI that interfaces the user with the firmware, enable them to send machine code to the firmware and to come up with a workflow to generate G-code from an .svg file.
Setting up the Controller
To automate the machine, we used a RAMPS kit. It is a set consisting of an Arduino board supposed to run the firmware, Pololu-style stepper motor drivers, as well as a shield for the Arduino board to connect power supply and drivers. The drivers we used were of the type DRV8428. For assembling everything, we followed the steps at the RepRap wiki.

The power supply we used had open contacts with above 200V.

We wanted to avoid touching them so a cover was designed using FreeCAD. Note the rounds where two straight pieces meet. This is to avoid the cover breaking at the corner.

Every driver had a slot to put it at. Under the driver there were jumpers. They could be set to configure microstepping. We set all jumpers to enable the setting with the smallest-possible steps. The driver carrier had an adjustable resistor which was used to adjust the maximum current the driver would provide to the motor.
 We followed this tutorial by Pololu. First, everything but the motor was connected. The maximum current was found from the data sheet of the motor. In our case it was 2.5A (we used a wantai stepper motor with the model number 42BYGHW811). Following the driver-specific information in Pololu's tutorial, the maximum voltage to be measured between the potentiometer and GND was 1.25V. We set the voltage to 1.2V to be safe that we do not give too much current to the motor. We repeated this procedure for two drivers in total since we had two stepper motors to drive.
Afterwards, we needed to connect the motors to the board. Our stepper motors had four wires attached. The question to answer was how to arrange them so that the motor works correctly? Each motor contained two coils. The two ends of each coil were led out of the motor. There were two coils so there were four cables in total. To identify a coil pair, we measured the current between each pair of wires and turned the motor. This induced a current in both coils which could then be measured. The current induced was alternating current since the motor was turned manually. We measured with the direct current setting. This did not matter that much, because we only were interested if there is current flowing or not. We noticed a significant change in the measured current when the motor was turned. The pairs identified were blue, red and black, green.
 We soldered the cables so that the corresponding cables were next to each other. The next question was: does the motor turn the right way around? The direction of the motor could be changed without changing the firmware by just switching the cables. The following rules hold where
 1A 1B 2A 2B is the original order of the cables:
- If you change the order of one of the cable pairs (
1A 1B 2B 2A), the direction of the motor changes. - If you change the order of both of the pairs (
1B 1A 1B 1A), this is invariant to the direction of the motor direction. - If you change both cable directions and you switch the pairs (
2B 2A 1B 1A), this changes the direction of the motor.
It is important to note that one always needs to turn off the power when messing with the connections of the ramps board. Plugging the motor cables while there is still a power supply connected could destroy the circuitry in the RAMPS kit. For the following video the hello world sketch provided at the RAMPS wiki page was flashed.
Regarding orientation of the connector: the side of the connector that is facing the driver is labelled with "d".
Setting up Firmware & GUI
As a firmware to flash onto the Arduino we used Marlin. We followed the installation instructions and used PlatformIO. There were no difficulties with that. First, we flashed it without further modifications. Later, we adjusted the file Configuration.h to configure the firmware. To send machine code from a desktop PC/laptop to the firmware via USB, we used Printrun with Pronterface as a GUI.
Note that the baud rate needs to be the same in the configuration file of the firmware as well as in Printrun.
#define BAUDRATE 250000
After adjusting this, one needed to connect to the Arduino board by hitting the corresponding button.
End Stops
We then connected the end stops to the ramps shield as described in the RAMPS wiki. With Marlin, the G-code M119 yielded the state of the end stops which was helpful for checking if their activation is recognized.

Servo Motors
To set up servo motors with RAMPS and Marlin one connects the servo motor as depcted in the RAMPS wiki. In Marlin's configuration, the following line needs to be uncommented.
#define NUM_SERVOS 1 // Note: Servo index starts with 0 for M280-M282 commands
Then, the servo could be controlled using the G-codes M280, M281, and M282.

Configuring Firmware: Motion System & Steps/mm
Our motion system was not as simple as "one motor turns, the other not -> only one axis moves", because instead of a cartesian motion system we had an H-bot. When both motors were turning in the opposite direction, the vertical axis was moving. When both motors were turning in the same direction, the horizontal axis was moving. When only one motor was moving and the other one not, both the vertical and the horizontal axis were moving to the same extent. For the mechanism to be automated correctly, we needed to configure the firmware accordingly. The configuration for the motor behavior was the same as with the CoreXY motion system, so we configured the firmware to drive the motors according to CoreXY's rules.
// Enable one of the options below for CoreXY, CoreXZ, or CoreYZ kinematics,
// either in the usual order or reversed
#define COREXY
//#define CoreXZ
//#define COREYZ
//#define COREYX
//#define COREZX
//#define COREZY
We put a tape onto our capstan thread and marked the extrusion with white tape where the right end of the tape attached to the thread was. We then moved 10mm in one axis, marked the extrusion again and measured the distance.
The distance traveled was 78.4mm instead of 100mm. We stated a ratio equation:
desired distance travelled/actual distance travelled = desired steps/actual steps. The unknown variable was desired steps. Resolving the equation yielded desired steps = desired distance travelled/real distance travelled * actual steps. The actual steps were taken from the original configuration which were 80. Calculating the new steps/mm yielded a value of 102 steps/mm. It is a good idea to repeat this procedure iteratively several times to get a more precise value for the steps/mm. However, already at the second iteration, we got a new value of 102.4 steps/mm, so we did not change the steps/mm any further. For more calculations regarding stepper motors in CNC machines, this calculator might come in handy.
/**
 * Default Axis Steps Per Unit (linear=steps/mm, rotational=steps/deg)
 * Override with M92
 * X, Y, Z [, I [, J {, K...]]], E0 [, E1[, E2...]]
 */
#define DEFAULT_AXIS_STEPS_PER_UNIT { 102, 102, 400, 500 }
In the end, it was possible for our machine to move correctly.
Below one can see a homing procedure.
Generating a Toolpath Using Inkscape
The machine code was calculated using the corresponding extension in Inkscape. The procedure can be seen below.
This made it possible for the machine to move according to the specified shape.
Drawing a Circle
For testing, we generated a toolpath to draw a simple circle. Checking the G-code using ncviewer confirmed that the G-code indeed described a circle being drawn.

Unfortunately, the result was not a circle. Also, the origin of the start and the end position of the head was different. This was not as intended.
The problem here was thet the capstan drive thread was a little bit too loose and the pen was not stiff enough. We tightened the thread and, due to lack of time for this week, we used hot glue to fixture the pen at the machine's head.

After that, a circle was drawn. This time, we also fixtured the paper by applying 3m77 spray onto the surface the paper was drawn on. When doing that we learned a trick: after using a spray can, turn it upside down and spray until only air comes out. This way, the nozzle gets cleaned. Otherwise it might get sealed by residual material from inside the can.
Working with G-code
During working with the machine and debugging it, we used G-code to manually control the machine. The following G-codes turned out to be used often:
- G092: set WCS position (useful for homing manually)
- M114: get position
- G054 - G059: handle different WCSs
- G91: relative coordinate mode
- G90: absolute coordinate mode
References
Below, some references are listed.
Urumbu Drivers
- Urumbu
- Urumbu, further work
- Project Sampo, using Urumbu
- OSAP, a web framework for talking with USB-driven hardware modules (e.g. motors), showing everything you would make on pcbs onto the desktop for rapid prototyping. However, this would be overkill for our project.
- Urumbu_IO
- UrumbubotXY 2.0
Capstan Drive
Other
- Cable carriers 3d printable
- flexible XY-stage
- Pen mount:
- http://www.makelangelo.com/
- https://wiki.opensourceecology.org/wiki/Ferdi
- motor
- cable carrier
- GrabCAD
Possible improvements
There were some points we could still improve with the machine.
- We have not been able to set up the servo motor for lifting the pen. Therefore, we could only create drawings consisting of one continuous line. The pen-lifting automation could be added.
- Right now, the origin of the WCS is at the top right of the machine's bed. It could be changed to be at the bottom l
- The capstan guide could be improved. Either the thread is guided inside the extrusion (for that one would need to design custom v-wheels) or the tail is designed wider so that the thread leading towards the tail is not angled.
- An enclosure for the power supply and the RAMPS board could be designed.
Digital Files
- All digital files can be found in this repository, where this commit is guaranteed to be the state of this documentation.